Tag Archives: collision detection

JavaFX 2 GameTutorial Part 4

JavaFX 2 Game Tutorial Part 4

Figure 1 JavaFX 2 Game Tutorial Part 4


Introduction

This is part four of a six part series related to a JavaFX 2 Game Tutorial. If you’ve missed Part 1, Part 2, or Part 3, I encourage you to go through them before beginning this tutorial. To recap, in Part 3 I gave you a little history of the many classic arcade style games and the different input devices that were used. I then showed you how to create a simple game similar to the famous arcade ‘Asteroids’. The controls (movement of the ship) were, however, more similar to those of the PC game ‘Star Craft’. In Part 3, you should have a good understanding of how to receive input from your keyboard and mouse.

This tutorial is about tweaking Part 2’s game engine and updating the existing ‘Asteroids’ style game from Part 3 to handle collision detection. In this tutorial, I will briefly talk about sprites and how to handle collision detection. The spaceship will now have the ability to generate a force field to protect itself from enemies and asteroids. This is reminiscent of the classic arcade ‘Asteroids Deluxe’.  If you want to run the demo, scroll down and click on the WebStart button below. Please read the requirements before launching the game.

What is a Sprite?

According to Wikipedia, “a sprite is a two-dimensional image or animation that is integrated into a larger scene.” From the Java gaming world view, a sprite is an object containing image frames and additional data based on the context of an actor to be animated onto the scene area. In the days of Walt Disney, when cartoons were drawn with a pencil and paper, the artist  produced many drawings that became animations. This example points to the creation of the flip book. I’m sure you’ve created flip books as a kid. I know I did. I used to doodle and make cool animations with all the corners of my notebooks. In our Asteroid type game, I created a sprite object which contains all of the images (ImageView) of the ship pre-rotated just like a flip book. To animate the ship turning, I made the current frame visible and the rest of the frames not visible. Similar to a flip book, it will appear to be rotated about its center (pivot) point. A sprite can also contain other information, such as velocity or health points.

Collision Detection

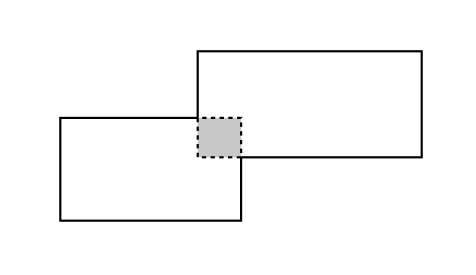
When actors or sprites animate across the scene, the game engine will check each sprite against other sprites to determine if they have collided into one another. This process should be very efficient especially when you have numerous sprites moving about the screen. There are tradeoffs when it comes to being efficient. Because each cycle in the game loop will check for collision, being more accurate usually degrades your performance. Many games will use the bounding region of the image to determine if two sprites have collided into one another.  Some games use rectangles as bounding regions. Shown below in figure 2 are two sprites colliding:

Bounding box as a rectangular collision region.

Figure 2 Bounding box as a rectangular collision region.

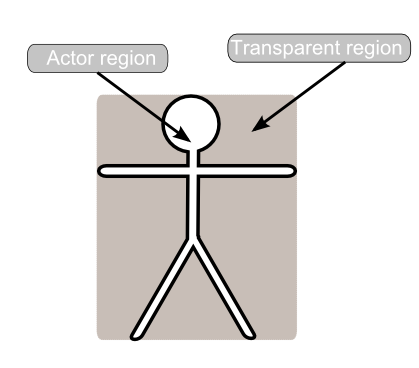
I’m sure you’ll know by now that most actors (images) in games don’t appear rectangular when pixels surrounding the actor are transparent. However, the actor or image is indeed rectangular even if the pixels are transparent or not.


Actor Image

Figure 3 depicts an actor image

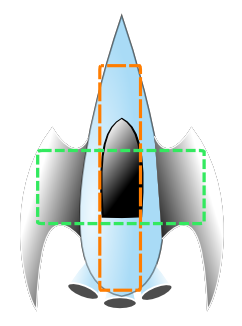
Those games which use rectangular bounding regions usually make the bounding box inscribed in the sprite’s image. Shown below in figure 4 two rectangular bounding regions (orange and green) are inscribed in the spaceship image.

Two rectangles used as collision bounding boxes.

Figure 4 Two rectangles used as collision bounding boxes.

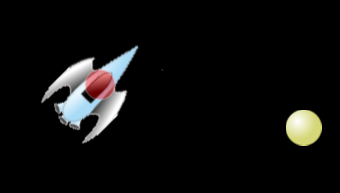
I’m sure you will notice that the nose tip of the ship and wings are not covered by either bounding box. This means that when an asteroid overlaps the unbounded region of the sprite the collision will not occur. Some games use this strategy; you will notice that the sprites’ rectangular bounding regions are small and placed in key areas of the sprite image.  Greater precision will be found with better algorithms for polygons and other non-rectangular shapes. In this blog entry, I basically use circles as bounding regions and not rectangles. I could have made each sprite contain an array of collision shapes, but instead, I chose to have only one collision region for each sprite. Each collision region will be a circle shape on the scene graph. For the spaceship, I inscribed the circle based on the center point of the ship with the radius extended to the cock pit of the ship. Shown below in figure 5 the bounded circular collision area of the ship is depicted as a red circle.

The ship's collision region.

Figure 5 The ship’s collision region.

I chose a circle as the bounding region because of the relative ease to determine the collision of two objects based on the distance formula (Pythagorean theorem) which only requires each sprite’s bounding region’s center point and their radii.  After calculating the distance based on the two center points, you will compare the result to see if it is less than or equal to the sum of the two radii. If the result does indeed come out to be less than or equal to the sum of the two radii then a collision has occurred.  Figure 6 depicts  how the distance formula relates to the two center points of circular bounding regions.

Distance formula

Figure 6 distance formula between two center points.

The following code creates the main game loop from the GameWorld class:

  @Override
  public void handle(javafx.event.ActionEvent event) {

     // update actors
     updateSprites();

     // check for collision
     checkCollisions();

     // removed dead things
     cleanupSprites();

  }

The code below creates the checkCollision() method from the GameWorld class:

    protected void checkCollisions() {
        // check other sprite's collisions
        spriteManager.resetCollisionsToCheck();
        // check each sprite against other sprite objects.
        for (Sprite spriteA : spriteManager.getCollisionsToCheck()) {
            for (Sprite spriteB : spriteManager.getAllSprites()) {
                if (handleCollision(spriteA, spriteB)) {
                    // The break helps optimize the collisions
                    //  The break statement means one object only hits another
                    // object as opposed to one hitting many objects.
                    // To be more accurate comment out the break statement.
                    break;
                }
            }
        }
    }

The derived Game World (TheExpanse) class’ implementation of its handleCollision() method:

    /**
     * How to handle the collision of two sprite objects.
     *
     * @param spriteA Sprite from the first list.
     * @param spriteB Sprite from the second list.
     * @return boolean returns a true if the two sprites have collided otherwise false.
     */
    @Override
    protected boolean handleCollision(Sprite spriteA, Sprite spriteB) {
        if (spriteA != spriteB) {
            if (spriteA.collide(spriteB)) {

                if (spriteA != myShip) {
                    spriteA.handleDeath(this);
                }
                if (spriteB != myShip) {
                    spriteB.handleDeath(this);
                }
            }
        }

        return false;
    }

The Sprite Class’ default implementation of its collide() method using the distance formula:

    public boolean collide(Sprite other) {

        if (collisionBounds == null || other.collisionBounds == null) {
            return false;
        }

        // determine it's size
        Circle otherSphere = other.collisionBounds;
        Circle thisSphere = collisionBounds;
        Point2D otherCenter = otherSphere.localToScene(otherSphere.getCenterX(), otherSphere.getCenterY());
        Point2D thisCenter = thisSphere.localToScene(thisSphere.getCenterX(), thisSphere.getCenterY());
        double dx = otherCenter.getX() - thisCenter.getX();
        double dy = otherCenter.getY() - thisCenter.getY();
        double distance = Math.sqrt(dx * dx + dy * dy);
        double minDist = otherSphere.getRadius() + thisSphere.getRadius();

        return (distance < minDist);
    }

The Sprite Class’ default implementation of its handleDeath() method:

    public void handleDeath(GameWorld gameWorld) {
        gameWorld.getSpriteManager().addSpritesToBeRemoved(this);
    }

The Atom (an asteroid or missile) class will override the handleDeath() method:


    public void handleDeath(GameWorld gameWorld) {
        implode(gameWorld);
        super.handleDeath(gameWorld);
    }

JavaFX 2 Sprite and Collision Demo

This simple demo game will be a mix between StarCraft and Asteroids. When using the mouse to navigate the ship, you will notice that the controls will resemble StarCraft’s Battle Cruiser. The objective is to fire your weapon at the spheres before they hit your spaceship or other spheres which implode upon impact. Because this is a simple tutorial or even a game in its early stages of development, the game doesn’t keep track of the score. I encourage you to go to GitHub to download the code and enhance the game. For the sake of brevity, I will not be showing all of the code changes, but I trust you will visit GitHub here: https://github.com/carldea/JFXGen for all the demos and source code.

Requirements:

  • Java 7 or later
  • JavaFX 2.1 or later
  • Windows XP or later (Should be available soon for Linux/MacOS)

A simple Asteroid type game called ‘The Expanse’.

Instructions:

  • Right mouse click (on Windows) to fly ship.
  • Left mouse click (left click on Windows mouse) to fire weapon.
  • Key press ’2′ to change to large missiles. (blue circular projectiles)
  • Other key press defaults to smaller missiles. (red circular projectiles)
  • Space bar key press will toggle a force field to protect the ship from enemies and asteroids.

Click on the Launch button below to start the demo:

Tutorial demo

Part 4 ‘The Expanse’ sprites/collision

Part 4 ‘Sprites/Collision’

Next up is Part 5 (Sound) where you will be using JavaFX to produce sound effects for your game.

References

Definition of a sprite: http://en.wikipedia.org/wiki/Sprite_%28computer_graphics%29

Walt Disney: http://en.wikipedia.org/wiki/Walt_Disney

How to make a flip book: http://www.bitrebels.com/design/how-to-create-a-flip-book/

JavaFX’s ImageView : http://docs.oracle.com/javafx/2/api/javafx/scene/image/ImageView.html

Collision detection: http://zetcode.com/tutorials/javagamestutorial/collision/

AABBs Collision detection in Java: http://www.youtube.com/watch?v=JIxV-LXqa1g

Pythagorean theorem: http://en.wikipedia.org/wiki/Pythagorean_theorem

Distance formula: http://en.wikipedia.org/wiki/Distance

Serious game of Asteroids Deluxe (Youtube): http://www.youtube.com/watch?v=6DG-GJENHgg

JavaFX 2 GameTutorial Part 2

UPDATE: Link to the source code is at the end of the blog.
Demo of a JavaFX 2 game tutorial

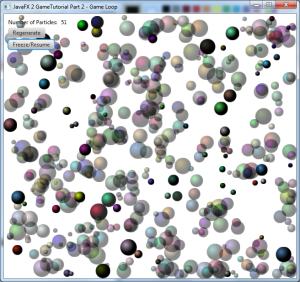
Atom Smasher – Game Loop Demo.

 Introduction

This is the second installment of a series of blog entries relating to a JavaFX 2 Game Tutorial. If you have not read Part 1 please see the introduction section of the JavaFX 2 Game Tutorial. To recap in Part 1, I mention some aspects of game play and a simple demo of a prototype spaceship (comprised of simple shapes) that is capable of navigating via the mouse. Disclaimer: This is a long tutorial so if you just want to run the demo just Click HERE. The demo is called Atom Smasher where you generate atoms (spheres) that collide. You may freeze the game to add more atoms. The objective is to have more than one atom alive and bouncing around. A text displays the current number of atoms floating around. Before beginning our discussion on a game loop I wanted to give you some background history about games and animation.

History

Back in the day (during the 80s-90s) many game programmers attempted to animate images has encountered the infamous screen flicker problem. This is where your sprites (graphic images) will often flash and make the game look quite awful. All monitors have a refresh rate where certain intervals the pixels will be redrawn (called vertical retrace CRTs). For example, if the refresh rate is 80 Hz it is approximately 80 times a second the screen is redrawn. If you are modifying things on the screen you can often be out of sync because of being in the middle of a refresh interval. What should you do about this? Well, actually there are two things that will help remedy this problem (double buffering & knowing when the cycle is occurring). Some clever developers created a technique called double buffering. Double buffering is a technique which consists of two surfaces where each takes turns on becoming the displayable surface and the other is an offscreen area (buffer surface). This technique is really a digital sleight of hand trick where the developer can pre calculate the sprites and their positions to be drawn on the offscreen surface. Once you are finished drawing on the offscreen buffer the code will switch it as the displayable surface. An important thing to point out is that we still have an issue due to the fact that we need to be notified when the refresh interval is about to begin the redraw process. In Java this ability is built in via the BufferStrategy API. So, where am I going with this? Sometimes explaining the past strategies will help us appreciate what we have today. Do we need to do this in JavaFX? Nope. Have no fear JavaFX is here! All of the issues that I’ve mentioned are all taken care of for us by using JavaFX’s Scene graph API. However, most games will still use the old fashion way of animating graphics and updating the game world called the ‘Game Loop’.

The Game Loop

Simply put the game loop is responsible for updating sprites (graphics), checking collision, and cleanup. Older game loops will check for key and mouse events as part of the loop. Since JavaFX abstracts events to allow the Scene or individual nodes to handle events the ability to listen to low level events aren’t necessary in our game loop. Shown below is a source code snippet of a typical game loop which will update sprites, check collisions, and cleanup sprites at each cycle. You will notice the Duration object from JavaFX 2.x which represents 60 divided by 1000 milliseconds or 60 frames per second(FPS). Each frame will call the handle() method of the JavaFX’s EventHandler interface in order to update the game world. Hypothetically, I’ve create three methods updateSprites(), checkCollisions(), and cleanupSprites() that will be invoked to handle sprites in the game.


   final Duration oneFrameAmt = Duration.millis(1000/60);
   final KeyFrame oneFrame = new KeyFrame(oneFrameAmt,
      new EventHandler() {

      @Override
      public void handle(javafx.event.ActionEvent event) {

         // update actors
         updateSprites();

         // check for collision
         checkCollisions();

         // removed dead things
         cleanupSprites();

      }
   }); // oneFrame

   // sets the game world's game loop (Timeline)
   TimelineBuilder.create()
      .cycleCount(Animation.INDEFINITE)
      .keyFrames(oneFrame)
      .build()
      .play();

The above code snippet is really all you need to create a simple game or animation. However, you may want to take things to the next level. You may want to create a game engine that can manage sprites and the state of the game world.

Game Engine

A game engine is a fancy name for a utility or library responsible for encapsulating the game world,  running the game loop, managing sprites, physics, etc. This is essentially a small game framework that allows you to extend or reuse so you don’t have to reinvent the wheel when creating a 2D game from scratch. To fast forward I created a UML class diagram of a design of a game engine.

Shown below is Figure 1 A JavaFX Game Engine Class diagram.

Figure 1. A JavaFX 2 Game Engine Design

In Figure 1 A JavaFX 2 Game Engine Design you will notice three classes a GameWorld, SpriteManager, and Sprite. The GameWorld class is responsible for initializing the game state, executing the game loop, updating sprites, handling sprite collisions, and cleaning up. Next is the SpriteManager class which in charge of managing sprites by adding, removing, and other house keeping for collisions. Lastly, is the Sprite class which is responsible for maintaining the state of an image (Actor). In a 2D world a sprite can contain the object’s velocity, rotation, scene node or image that eventually gets rendered at each cycle (key frame/frames per second).

Just a quick reminder on UML notation:

  • Plus symbol ‘+‘ denotes that a class member is public.
  • Minus symbol ‘‘ denotes that a class member is private
  • Hash symbol ‘#‘ denotes that a class member is protected.

GameWorld

Below is the source code implementation of the GameWorld class. Click to expand. Later you will see a class diagram depicting a simple demo game that will extend the GameWorld class (see AtomSmasher).

package carlfx.gameengine;

import javafx.animation.Animation;
import javafx.animation.KeyFrame;
import javafx.animation.Timeline;
import javafx.animation.TimelineBuilder;
import javafx.event.ActionEvent;
import javafx.event.EventHandler;
import javafx.scene.Group;
import javafx.scene.Scene;
import javafx.stage.Stage;
import javafx.util.Duration;

/**
 * This application demonstrates a JavaFX 2.x Game Loop.
 * Shown below are the methods which comprise of the fundamentals to a
 * simple game loop in JavaFX:
*
 *  <strong>initialize()</strong> - Initialize the game world.
 *  <strong>beginGameLoop()</strong> - Creates a JavaFX Timeline object containing the game life cycle.
 *  <strong>updateSprites()</strong> - Updates the sprite objects each period (per frame)
 *  <strong>checkCollisions()</strong> - Method will determine objects that collide with each other.
 *  <strong>cleanupSprites()</strong> - Any sprite objects needing to be removed from play.
 *
 * @author cdea
 */
public abstract class GameWorld {

    /** The JavaFX Scene as the game surface */
    private Scene gameSurface;
    /** All nodes to be displayed in the game window. */
    private Group sceneNodes;
    /** The game loop using JavaFX's <code>Timeline</code> API.*/
    private static Timeline gameLoop;

    /** Number of frames per second. */
    private final int framesPerSecond;

    /** Title in the application window.*/
    private final String windowTitle;

    /**
     * The sprite manager.
     */
    private final SpriteManager spriteManager = new SpriteManager();

    /**
     * Constructor that is called by the derived class. This will
     * set the frames per second, title, and setup the game loop.
     * @param fps - Frames per second.
     * @param title - Title of the application window.
     */
    public GameWorld(final int fps, final String title) {
        framesPerSecond = fps;
        windowTitle = title;
        // create and set timeline for the game loop
        buildAndSetGameLoop();
    }

    /**
     * Builds and sets the game loop ready to be started.
     */
    protected final void buildAndSetGameLoop() {

        final Duration oneFrameAmt = Duration.millis(1000/getFramesPerSecond());
        final KeyFrame oneFrame = new KeyFrame(oneFrameAmt,
            new EventHandler() {

                @Override
                public void handle(javafx.event.ActionEvent event) {

                    // update actors
                    updateSprites();

                    // check for collision
                    checkCollisions();

                    // removed dead things
                    cleanupSprites();

                }
        }); // oneFrame

        // sets the game world's game loop (Timeline)
        setGameLoop(TimelineBuilder.create()
                .cycleCount(Animation.INDEFINITE)
                .keyFrames(oneFrame)
                .build());
    }

    /**
     * Initialize the game world by update the JavaFX Stage.
     * @param primaryStage
     */
    public abstract void initialize(final Stage primaryStage);

    /**Kicks off (plays) the Timeline objects containing one key frame
     * that simply runs indefinitely with each frame invoking a method
     * to update sprite objects, check for collisions, and cleanup sprite
     * objects.
     *
     */
    public void beginGameLoop() {
        getGameLoop().play();
    }

    /**
     * Updates each game sprite in the game world. This method will
     * loop through each sprite and passing it to the handleUpdate()
     * method. The derived class should override handleUpdate() method.
     *
     */
    protected void updateSprites() {
        for (Sprite sprite:spriteManager.getAllSprites()){
            handleUpdate(sprite);
        }
    }

    /** Updates the sprite object's information to position on the game surface.
     * @param sprite - The sprite to update.
     */
    protected void handleUpdate(Sprite sprite) {
    }

    /**
     * Checks each game sprite in the game world to determine a collision
     * occurred. The method will loop through each sprite and
     * passing it to the handleCollision()
     * method. The derived class should override handleCollision() method.
     *
     */
    protected void checkCollisions() {
        // check other sprite's collisions
        spriteManager.resetCollisionsToCheck();
        // check each sprite against other sprite objects.
        for (Sprite spriteA:spriteManager.getCollisionsToCheck()){
            for (Sprite spriteB:spriteManager.getAllSprites()){
                if (handleCollision(spriteA, spriteB)) {
                    // The break helps optimize the collisions
                    //  The break statement means one object only hits another
                    // object as opposed to one hitting many objects.
                    // To be more accurate comment out the break statement.
                    break;
                }
            }
        }
    }

    /**
     * When two objects collide this method can handle the passed in sprite
     * objects. By default it returns false, meaning the objects do not
     * collide.
     * @param spriteA - called from checkCollision() method to be compared.
     * @param spriteB - called from checkCollision() method to be compared.
     * @return boolean True if the objects collided, otherwise false.
     */
    protected boolean handleCollision(Sprite spriteA, Sprite spriteB) {
        return false;
    }

    /**
     * Sprites to be cleaned up.
     */
    protected void cleanupSprites() {
        spriteManager.cleanupSprites();
    }

    /**
     * Returns the frames per second.
     * @return int The frames per second.
     */
    protected int getFramesPerSecond() {
        return framesPerSecond;
    }

    /**
     * Returns the game's window title.
     * @return String The game's window title.
     */
    public String getWindowTitle() {
        return windowTitle;
    }

    /**
     * The game loop (Timeline) which is used to update, check collisions, and
     * cleanup sprite objects at every interval (fps).
     * @return Timeline An animation running indefinitely representing the game
     * loop.
     */
    protected static Timeline getGameLoop() {
        return gameLoop;
    }

    /**
     * The sets the current game loop for this game world.
     * @param gameLoop Timeline object of an animation running indefinitely
     * representing the game loop.
     */
    protected static void setGameLoop(Timeline gameLoop) {
        GameWorld.gameLoop = gameLoop;
    }

    /**
     * Returns the sprite manager containing the sprite objects to
     * manipulate in the game.
     * @return SpriteManager The sprite manager.
     */
    protected SpriteManager getSpriteManager() {
        return spriteManager;
    }

    /**
     * Returns the JavaFX Scene. This is called the game surface to
     * allow the developer to add JavaFX Node objects onto the Scene.
     * @return
     */
    public Scene getGameSurface() {
        return gameSurface;
    }

    /**
     * Sets the JavaFX Scene. This is called the game surface to
     * allow the developer to add JavaFX Node objects onto the Scene.
     * @param gameSurface The main game surface (JavaFX Scene).
     */
    protected void setGameSurface(Scene gameSurface) {
        this.gameSurface = gameSurface;
    }

    /**
     * All JavaFX nodes which are rendered onto the game surface(Scene) is
     * a JavaFX Group object.
     * @return Group The root containing many child nodes to be displayed into
     * the Scene area.
     */
    public Group getSceneNodes() {
        return sceneNodes;
    }

    /**
     * Sets the JavaFX Group that will hold all JavaFX nodes which are rendered
     * onto the game surface(Scene) is a JavaFX Group object.
     * @param sceneNodes The root container having many children nodes
     * to be displayed into the Scene area.
     */
    protected void setSceneNodes(Group sceneNodes) {
        this.sceneNodes = sceneNodes;
    }

}

SpriteManager

A sprite manager class is a helper class to assist the game loop to keep track of sprites. Normally a sprite manager will contain all sprites and each sprite contains a JavaFX Node that is displayed onto the Scene graph.
Shown below is the source code. Click to expand.

package carlfx.gameengine;

import java.util.*;

/**
 * Sprite manager is responsible for holding all sprite objects, and cleaning up
 * sprite objects to be removed. All collections are used by the JavaFX
 * application thread. During each cycle (animation frame) sprite management
 * occurs. This assists the user of the API to not have to create lists to
 * later be garbage collected. Should provide some performance gain.
 * @author cdea
 */
public class SpriteManager {
    /** All the sprite objects currently in play */
    private final static List GAME_ACTORS = new ArrayList<>();

    /** A global single threaded list used to check collision against other
     * sprite objects.
     */
    private final static List CHECK_COLLISION_LIST = new ArrayList<>();

    /** A global single threaded set used to cleanup or remove sprite objects
     * in play.
     */
    private final static Set CLEAN_UP_SPRITES = new HashSet<>();

    /** */
    public List getAllSprites() {
        return GAME_ACTORS;
    }

    /**
     * VarArgs of sprite objects to be added to the game.
     * @param sprites
     */
    public void addSprites(Sprite... sprites) {
        GAME_ACTORS.addAll(Arrays.asList(sprites));
    }

    /**
     * VarArgs of sprite objects to be removed from the game.
     * @param sprites
     */
    public void removeSprites(Sprite... sprites) {
        GAME_ACTORS.removeAll(Arrays.asList(sprites));
    }

    /** Returns a set of sprite objects to be removed from the GAME_ACTORS.
     * @return CLEAN_UP_SPRITES
     */
    public Set getSpritesToBeRemoved() {
        return CLEAN_UP_SPRITES;
    }

 /**
     * Adds sprite objects to be removed
     * @param sprites varargs of sprite objects.
     */
    public void addSpritesToBeRemoved(Sprite... sprites) {
        if (sprites.length > 1) {
            CLEAN_UP_SPRITES.addAll(Arrays.asList((Sprite[]) sprites));
        } else {
            CLEAN_UP_SPRITES.add(sprites[0]);
        }
    }

    /**
     * Returns a list of sprite objects to assist in collision checks.
     * This is a temporary and is a copy of all current sprite objects
     * (copy of GAME_ACTORS).
     * @return CHECK_COLLISION_LIST
     */
    public List getCollisionsToCheck() {
        return CHECK_COLLISION_LIST;
    }

    /**
     * Clears the list of sprite objects in the collision check collection
     * (CHECK_COLLISION_LIST).
     */
    public void resetCollisionsToCheck() {
        CHECK_COLLISION_LIST.clear();
        CHECK_COLLISION_LIST.addAll(GAME_ACTORS);
    }

    /**
     * Removes sprite objects and nodes from all
     * temporary collections such as:
     * CLEAN_UP_SPRITES.
     * The sprite to be removed will also be removed from the
     * list of all sprite objects called (GAME_ACTORS).
     */
    public void cleanupSprites() {

        // remove from actors list
        GAME_ACTORS.removeAll(CLEAN_UP_SPRITES);

        // reset the clean up sprites
        CLEAN_UP_SPRITES.clear();
    }
}

Sprite

The Sprite class represents an image or node to be displayed onto the JavaFX Scene graph. In a 2D game a sprite will contain additional information such as its velocity for the object as it moves across the scene area. The game loop will call the update() and collide() method at every interval of a key frame.
Shown below is the source code. Click to expand.

package carlfx.gameengine;

import java.util.ArrayList;
import java.util.List;
import javafx.animation.Animation;
import javafx.scene.Node;

/**
 * The Sprite class represents a image or node to be displayed.
 * In a 2D game a sprite will contain a velocity for the image to
 * move across the scene area. The game loop will call the update()
 * and collide() method at every interval of a key frame. A list of
 * animations can be used during different situations in the game
 * such as rocket thrusters, walking, jumping, etc.
 * @author cdea
 */
public abstract class Sprite {

    /** Animation for the node */
    public List animations = new ArrayList<>();

    /** Current display node */
    public Node node;

    /** velocity vector x direction */
    public double vX = 0;

    /** velocity vector y direction */
    public double vY = 0;

    /** dead? */
    public boolean isDead = false;

    /**
     * Updates this sprite object's velocity, or animations.
     */
    public abstract void update();

    /**
     * Did this sprite collide into the other sprite?
     *
     * @param other - The other sprite.
     * @return
     */
    public boolean collide(Sprite other) {
        return false;
    }
}

JavaFX 2 Game Loop Demo – Atom Smasher

Whew! If you’ve got this far you are one brave soul. Let’s take a small break and try out the demo I created using the game engine above.
Shown below is a Java Webstart button to launch the game demo. Later, you will see the design and source code detailing how it was created.

Requirements:

  • Java 7 or later
  • JavaFX 2.0.2 2.1 or later
  • Windows XP or later (Should be available soon for Linux/MacOS)
AtomSmasher Game loop demo

Demo

GameLoopPart2 Design

Below is a class diagram of the game demo called Atom Smasher which uses the game engine framework mentioned earlier.
Shown below is Figure 2 Atom Smasher Class Diagram.

Figure 2. Atom Smasher Class Diagram

GameLoopPart2

The GameLoopPart2 is the driver or main JavaFX application that runs the game. This creates a GameWorld object to be initialized and starts the game loop.
Shown below is the source code. Click to expand.

package carlfx;

import carlfx.gameengine.GameWorld;
import javafx.application.Application;
import javafx.stage.Stage;

/**
 * The main driver of the game.
 * @author cdea
 */
public class GameLoopPart2 extends Application {

    GameWorld gameWorld = new AtomSmasher(60, "JavaFX 2 GameTutorial Part 2 - Game Loop");
    /**
     * @param args the command line arguments
     */
    public static void main(String[] args) {
        launch(args);
    }

    @Override
    public void start(Stage primaryStage) {
        // setup title, scene, stats, controls, and actors.
        gameWorld.initialize(primaryStage);

        // kick off the game loop
        gameWorld.beginGameLoop();

        // display window
        primaryStage.show();
    }

}

AtomSmasher

AtomSmasher is a derived class of the GameWorld class. It creates many spheres that animate with random velocities, colors and positions. Button controls lets the user generate more ‘atoms’ (JavaFX Circle nodes). As each atom collides with one another they will invoke the implode() method that produces a fade transition animation. You will notice how easy it is to implement this game by simply implementing initialize(), handleUpdate(), handleCollision(), and cleanupSprites() methods. Once implemented the game engine does the rest. The initialize() method creates the button controls for the user. To update the sprites positions or change the game state you will implement the handleUpdate() method. To compare all sprites if they have collided with one another you will implement the handleCollision(). The last part of the game loop’s life cycle is cleaning up sprites. Cleaning up means updating the sprite manger and updating the JavaFX Scene (removing nodes).
Shown below is the source code. Click to expand.

package carlfx;

import carlfx.gameengine.GameWorld;
import carlfx.gameengine.Sprite;
import java.util.Random;
import javafx.animation.Timeline;
import javafx.event.EventHandler;
import javafx.scene.Group;
import javafx.scene.Scene;
import javafx.scene.control.ButtonBuilder;
import javafx.scene.control.Label;
import javafx.scene.input.MouseEvent;
import javafx.scene.layout.HBoxBuilder;
import javafx.scene.layout.VBox;
import javafx.scene.layout.VBoxBuilder;
import javafx.scene.paint.Color;
import javafx.scene.shape.Circle;
import javafx.stage.Stage;
import static javafx.animation.Animation.Status.RUNNING;
import static javafx.animation.Animation.Status.STOPPED;

/**
 * This is a simple game world simulating a bunch of spheres looking
 * like atomic particles colliding with each other. When the game loop begins
 * the user will notice random spheres (atomic particles) floating and
 * colliding. The user is able to press a button to generate more
 * atomic particles. Also, the user can freeze the game.
 *
 * @author cdea
 */
public class AtomSmasher extends GameWorld {
    /** Read only field to show the number of sprite objects are on the field*/
    private final static Label NUM_SPRITES_FIELD = new Label();

    public AtomSmasher(int fps, String title){
        super(fps, title);
    }

    /**
     * Initialize the game world by adding sprite objects.
     * @param primaryStage
     */
    @Override
    public void initialize(final Stage primaryStage) {
        // Sets the window title
        primaryStage.setTitle(getWindowTitle());

        // Create the scene
        setSceneNodes(new Group());
        setGameSurface(new Scene(getSceneNodes(), 640, 580));
        primaryStage.setScene(getGameSurface());

        // Create many spheres
        generateManySpheres(150);

        // Display the number of spheres visible.
        // Create a button to add more spheres.
        // Create a button to freeze the game loop.
        final Timeline gameLoop = getGameLoop();
        VBox stats = VBoxBuilder.create()
            .spacing(5)
            .translateX(10)
            .translateY(10)
            .children(HBoxBuilder.create()
                .spacing(5)
                .children(new Label("Number of Particles: "), // show no. particles
                    NUM_SPRITES_FIELD).build(),

                    // button to build more spheres
                    ButtonBuilder.create()
                        .text("Regenerate")
                        .onMousePressed(new EventHandler() {
                            @Override
                            public void handle(MouseEvent arg0) {
                                generateManySpheres(150);
                            }}).build(),

                    // button to freeze game loop
                    ButtonBuilder.create()
                        .text("Freeze/Resume")
                        .onMousePressed(new EventHandler() {

                            @Override
                            public void handle(MouseEvent arg0) {
                                switch (gameLoop.getStatus()) {
                                    case RUNNING:
                                        gameLoop.stop();
                                        break;
                                    case STOPPED:
                                        gameLoop.play();
                                        break;
                                }
                            }}).build()
            ).build(); // (VBox) stats on children

        // lay down the controls
        getSceneNodes().getChildren().add(stats);
    }

    /**
     * Make some more space spheres (Atomic particles)
     */
    private void generateManySpheres(int numSpheres) {
        Random rnd = new Random();
        Scene gameSurface = getGameSurface();
        for (int i=0; i (gameSurface.getWidth() - (circle.getRadius() * 2))) {
                newX = gameSurface.getWidth() - (circle.getRadius()  * 2);
            }

            // check for the bottom of screen the height newY is greater than height
            // minus radius times 2(height of sprite)
            double newY = rnd.nextInt((int) gameSurface.getHeight());
            if (newY > (gameSurface.getHeight() - (circle.getRadius() * 2))) {
                newY = gameSurface.getHeight() - (circle.getRadius() * 2);
            }

            circle.setTranslateX(newX);
            circle.setTranslateY(newY);
            circle.setVisible(true);
            circle.setId(b.toString());

            // add to actors in play (sprite objects)
            getSpriteManager().addSprites(b);

            // add sprite's
            getSceneNodes().getChildren().add(0, b.node);

        }
    }

    /**
     * Each sprite will update it's velocity and bounce off wall borders.
     * @param sprite - An atomic particle (a sphere).
     */
    @Override
    protected void handleUpdate(Sprite sprite) {
        if (sprite instanceof Atom) {
            Atom sphere = (Atom) sprite;

            // advance the spheres velocity
            sphere.update();

            // bounce off the walls when outside of boundaries
            if (sphere.node.getTranslateX() > (getGameSurface().getWidth()  -
                sphere.node.getBoundsInParent().getWidth()) ||
                sphere.node.getTranslateX() < 0 ) {                 sphere.vX = sphere.vX * -1;             }             if (sphere.node.getTranslateY() > getGameSurface().getHeight()-
                sphere.node.getBoundsInParent().getHeight() ||
                sphere.node.getTranslateY() < 0) {
                sphere.vY = sphere.vY * -1;
            }
        }
    }

    /**
     * How to handle the collision of two sprite objects. Stops the particle
     * by zeroing out the velocity if a collision occurred.
     * @param spriteA
     * @param spriteB
     * @return
     */
    @Override
    protected boolean handleCollision(Sprite spriteA, Sprite spriteB) {
        if (spriteA.collide(spriteB)) {
            ((Atom)spriteA).implode(this);
            ((Atom)spriteB).implode(this);
            getSpriteManager().addSpritesToBeRemoved(spriteA, spriteB);
            return true;
        }
        return false;
    }

    /**
     * Remove dead things.
     */
    @Override
    protected void cleanupSprites() {
        // removes from the scene and backend store
        super.cleanupSprites();

        // let user know how many sprites are showing.
        NUM_SPRITES_FIELD.setText(String.valueOf(getSpriteManager().getAllSprites().size()));

    }
}

Atom

The Atom class extends from the Sprite class. An atom is a sprite that appears like a spherical object that moves across the scene. An atom will have a random radius, color, and velocity. As each atom sprite collides with another atom they will animate a fade transition (the implode() method).
Shown below is the source code. Click to expand.

package carlfx;

import carlfx.gameengine.GameWorld;
import carlfx.gameengine.Sprite;
import javafx.animation.FadeTransitionBuilder;
import javafx.event.ActionEvent;
import javafx.event.EventHandler;
import javafx.scene.paint.Color;
import javafx.scene.paint.RadialGradient;
import javafx.scene.paint.RadialGradientBuilder;
import javafx.scene.paint.Stop;
import javafx.scene.shape.Circle;
import javafx.scene.shape.CircleBuilder;
import javafx.util.Duration;

/**
 * A spherical looking object (Atom) with a random radius, color, and velocity.
 * When two atoms collide each will fade and become removed from the scene. The
 * method called implode() implements a fade transition effect.
 *
 * @author cdea
 */
public class Atom extends Sprite {

    public Atom(double radius, Color fill) {
        Circle sphere = CircleBuilder.create()
                .centerX(radius)
                .centerY(radius)
                .radius(radius)
                .cache(true)
                .build();

        RadialGradient rgrad = RadialGradientBuilder.create()
                    .centerX(sphere.getCenterX() - sphere.getRadius() / 3)
                    .centerY(sphere.getCenterY() - sphere.getRadius() / 3)
                    .radius(sphere.getRadius())
                    .proportional(false)
                    .stops(new Stop(0.0, fill), new Stop(1.0, Color.BLACK))
                    .build();

        sphere.setFill(rgrad);

        // set javafx node to a circle
        node = sphere;

    }

    /**
     * Change the velocity of the atom particle.
     */
    @Override
    public void update() {
        node.setTranslateX(node.getTranslateX() + vX);
        node.setTranslateY(node.getTranslateY() + vY);
    }

    @Override
    public boolean collide(Sprite other) {
        if (other instanceof Atom) {
            return collide((Atom)other);
        }
       return false;
    }

    /**
     * When encountering another Atom to determine if they collided.
     * @param other Another atom
     * @return boolean true if this atom and other atom has collided,
     * otherwise false.
     */
    private boolean collide(Atom other) {

        // if an object is hidden they didn't collide.
        if (!node.isVisible() ||
            !other.node.isVisible() ||
            this == other) {
            return false;
        }

        // determine it's size
        Circle otherSphere = other.getAsCircle();
        Circle thisSphere =  getAsCircle();
        double dx = otherSphere.getTranslateX() - thisSphere.getTranslateX();
        double dy = otherSphere.getTranslateY() - thisSphere.getTranslateY();
        double distance = Math.sqrt( dx * dx + dy * dy );
        double minDist  = otherSphere.getRadius() + thisSphere.getRadius() + 3;

        return (distance < minDist);
    }

    /**
     * Returns a node casted as a JavaFX Circle shape.
     * @return Circle shape representing JavaFX node for convenience.
     */
    public Circle getAsCircle() {
        return (Circle) node;
    }

    /**
     * Animate an implosion. Once done remove from the game world
     * @param gameWorld - game world
     */
    public void implode(final GameWorld gameWorld) {
        vX = vY = 0;
        FadeTransitionBuilder.create()
            .node(node)
            .duration(Duration.millis(300))
            .fromValue(node.getOpacity())
            .toValue(0)
            .onFinished(new EventHandler() {
                @Override
                public void handle(ActionEvent arg0) {
                    isDead = true;
                    gameWorld.getSceneNodes().getChildren().remove(node);
                }
            })
            .build()
            .play();
    }
}

Conclusion

Hopefully you’ve got a chance to understand the fundamentals of a gaming loop and later apply the knowledge by implementing a robust game engine. Although, I briefly mention collision I am saving that for Part 4 of these tutorials. Please stay tuned for Part 3 where we will get into input using the keyboard or mouse. Feel free to experiment. Let me know what you come up with. 😉

Carl

UPDATE: Link to the source code is below:

To obtain the source code please download the link to a jar file below by using the ‘Save link As‘ option in your browser. If you are on a Windows system you can change the extension from ‘jar‘ to ‘zip‘ to be easily expanded. It will contain a directory ‘src‘ with the source code.

The source code location:

http://www.jroller.com/carldea/resource/javafx2.0_games/part2source_code.jar

The published version of the source code is at the GitHub called (JFXGen) for you to clone and fork to your hearts content (It’s there for you to use for your own projects). Enjoy.

https://github.com/carldea/JFXGen

git clone http://github.com:carldea/JFXGen.git

References:

CRTshttp://en.wikipedia.org/wiki/Refresh_rate

Double bufferinghttp://en.wikipedia.org/wiki/Double_buffering#Double_buffering

Developing Games in Java by David Brackeen with Bret Barker and Laurence Vanhelsuwe. Page 56 “Getting Rid of Flicker and Tearing”
BufferStrategy API – http://docs.oracle.com/javase/7/docs/api/java/awt/image/BufferStrategy.html

JavaFX to JavaScript and Back Part 2

Tons of Bouncy Balls

Tons of Bouncy Balls

Introduction

In the second installment of the series “JavaFX to JavaScript and Back” we will look at code! If you remember what we discussed in my previous post of Part 1 showing a demo of many bouncy balls. If you want to skip to the source code go to demo and click on download project.

Newcomers

If you are new and just getting started with JavaFX I strongly suggest JavaFX.com or Java.sun.com. If you are like me, one who knows enough to be dangerous please skip to Getting Started. Newcomers should take a look at books in the References section at the end of this article. Another awesome resource is the “Free” 15-Week JavaFX Programming (with Passion!) Online Course w/ Sang Shin & James Weaver.

Assumptions

  • NetBeans 6.5.1 is installed with JavaFX 1.2 pluggin.
  • Java SDK 1.6 update 14
  • Know basic JavaScript
  • Know basic HTML

Getting started

To give you a quick recap of the scenarios:

  1. Create Bouncy Balls (JavaScript to JavaFX)
  2. Remove Bouncy Balls (JavaFX to JavaScript)

Create a JavaFX Applet

Step 1: Create a Ball (Custom Node)
First create a class called Ball that extends a CustomNode. The key is overriding the create() method of the CustomNode class. We first create a Circle with a RadialGradient fill. Next we create a Group containing the circle in its content attribute. Then add the onMousePressed function to the group to detect a mouse pressed event which will remove this ball’s instance from the Scene (Game Area) and decrements the numBalls variable which updates the Web Page’s form element Number of Balls. Finally we return the group (ball variable).

class Ball extends CustomNode {
    public var velocity:Velocity;
    public var centerX:Integer=100;
    public var centerY:Integer=100;
    public var radius:Integer;
    public var fill:Color;
    protected override function create(): Node {
        var circle:Circle = Circle {
                centerX: centerX, centerY: centerY
                radius: radius
                fill: RadialGradient {
                        centerX: centerX - radius / 3
                        centerY: centerY - radius / 3

                        radius: radius
                        proportional: false
                        stops: [
                            Stop {
                                offset: 0.0
                                color: getRndColor()
                            },
                            Stop {
                                offset: 1.0
                                color: Color.BLACK
                            }
                        ] // stops
                } // RadialGradient
        } // circle
        var ball = Group{
            content:[circle];
            // remove ball
            onMousePressed: function( e: MouseEvent ):Void {
                delete this from gameArea;
                numBalls--;
            }
        } // Group

        return ball;
    } // create()
} // Ball

Step 2: Create initial ball to be put in Scene

You should notice I’ve created a few script level functions which conveniently return random values to create a Ball node. I won’t list those function for brevity. The random generated attributes are: velocity, centerX, centerY, radius, circle.fill = (RadialGradient 1st stop Color [Step 1 – Line 19])

// create an initial ball to float around.
var initialBallRadius = getRndRadius();
var rndCenter:Point = getRndCenter(500, 400, initialBallRadius);
var firstBall = Ball{
    velocity:getRndVelocity()
    centerX: rndCenter.x
    centerY: rndCenter.y
    radius: initialBallRadius
};

Step 3: Create the Scene to display Balls
The variable gameArea is a sequence of Nodes. You will notice the ball instance from Step 2 is the first node in the sequence. The scene’s content attribute is bound to the gameArea variable. During run time as nodes are added and removed from the game area the scene will dynamically update the visible nodes.

var gameArea:Node[] = [firstBall, toggleAnimationButton, mainRectRegion];
var scene:Scene = Scene {
        content: bind gameArea
        fill:Color.TRANSPARENT
};

Step 4: Create the Stage
This is the top level container which holds the scene.

Stage {
    title: "Application title"
    width: 500
    height: 400
    opacity: bind mainScreenOpacity;
    scene: scene
}

Step 5: Create a game or animation loop using the Timeline class
Here we create a Timeline instance that will run indefinitely (Timeline.INDEFINITE) with a single key frame (KeyFrame) which periodically updates each bouncy ball’s attributes which eventually renders each ball node with a new x and y position based on the velocity. Also the Timeline (gameLoop) is started immediately using the play() function.

var gameLoop:Timeline = Timeline {
    repeatCount: Timeline.INDEFINITE
    keyFrames : [
        KeyFrame {
            time: 1s / 50
            canSkip : true
            action: function() {
                for (node:Node in gameArea) {
                    if (not (node instanceof Ball)){
                        continue; // don't update non balls
                    }
                    var ball = node as Ball;
                    var xMin = ball.boundsInParent.minX;
                    var yMin = ball.boundsInParent.minY;
                    var xMax = ball.boundsInParent.maxX;
                    var yMax = ball.boundsInParent.maxY;

                    // Collision - boundaries
                    if (xMin  scene.width){
                       ball.velocity.xVelocity = ball.velocity.xVelocity * -1;
                    }
                    if (yMin  scene.height){
                       ball.velocity.yVelocity = ball.velocity.yVelocity * -1;
                    }

                    ball.translateX = ball.translateX + ball.velocity.xVelocity;
                    ball.translateY = ball.translateY + ball.velocity.yVelocity;
                }
            } // action
        } //
    ]
};
gameLoop.play();

Step 6: Create the AppletStageExtension
This is the reference to the JavaFX applet which would assist with browser functionality such as the evaluation of JavaScript code.

var applet: AppletStageExtension;

Step 7: Create the numBalls variable keeping track of adds and removes.
The numBalls variable has a trigger (on replace) that updates the HTML page’s input text field “numBalls“. You should notice the id attribute of the tag is name “numBalls“. An id is a way to uniquely locate the form element in the HTML DOM (in this case a reference to the input field. When numBalls variable changes the trigger will evaluate the JavaScript code “document.getElementById(‘numBalls’).value = {numBalls}”. What this does is populate the form element field’s ‘id’ called “numBalls” whenever the JavaFX variable numBalls is updated.

var numBalls:Integer = 1 on replace {
    applet.eval("document.getElementById('numBalls').value = {numBalls}");
};

Step 8: Create a JavaFX function to add lots of balls

The HTML Web page will have a JavaScript function that would call the JavaFX function below when the user presses the Add Ball(s) button.  javafxtojavascriptandback8You will notice the FX.deferAction() call, which ensures updates to JavaFX classes are happening on the JavaFX main processing thread. This function will instantiate num balls inserts into the game area (Scene content) and increments the numBalls (trigger will update Web page’s form element).

// This function is called from the JavaScript button and numBallsToAdd field
function addBalls(num:Integer) : Void {
    FX.deferAction(function() : Void {
        for( i in [1..num]){
            var curBallRadius = getRndRadius();
            var rndCenter:Point = getRndCenter(500, 400, curBallRadius);
            var b = Ball{
                velocity:getRndVelocity()
                centerX: rndCenter.x
                centerY: rndCenter.y
                radius: curBallRadius
                fill: getRndColor()
            };
            insert b into gameArea;
            numBalls++;
        }
    });
}

Create a HTML Web page containing the JavaFX applet

Step 9: Create HTML Web page to display JavaFX applet

Run in Browser

Run in Browser

After creating the project in NetBeans select project / properties / Run (categories) / Application Execution Model – Run in Browser.

Step 10: Build Project

Building the project which will create files in the {PROJECT_HOME}/dist directory.

Step 11: Copy originally NetBeans created HTML file of the dist directory to another name

Use the copied and renamed HTML file and not the original because when the build process occurs it will overwrite the original HTML generated file.

Step 12: Modify HTML code to contain JavaScript to call JavaFX applet.

    javafx(
        {
              archive: "JavaFXtoJavaScript.jar",
              draggable: true,
              width: 500,
              height: 400,
              code: "javafxtojavascript.Main",
              name: "JavaFXtoJavaScript",
			  id: "ballApp"
        },
		{ isApplet: "true" }
    );

function addBalls() {
	document.ballApp.script.addBalls(document.getElementById('numBallsToAdd').value);
}

Step 13: Modify HTML to contain Form Elements.

<form>
<table>
<tr><th>Add balls to Scene :</th>
<td><input id=”numBallsToAdd” name=”numBallsToAdd” value=”1″/></td>
<td><input onClick=”addBalls();” type=”button” name=”addButton” value=”Add Ball(s)”/></td>
</tr>
<tr>
<th>Number of balls: </th>
<td><input id=”numBalls” name=”numBalls” READONLY/></td>
</tr>
</table>
<br/>
</form>

Running Applet in Browser through NetBeans

Step 14: Run application or hit F6 key

This will launch the JavaFX applet into the browser from the original HTML page created from the build. Go to the address and modify the URL (Just the file name) to use the modified copy which would run the JavaFX applet along with the form elements added from step 12 – 13.

Conclusion

Although the example only used simple attributes of the AppletStageExtension there are other properties and events to explore such as onAppletRestored, showDocument(), etc.  Hopefully we can get away from HTML and just have rich client applications, however I don’t think the browser is going away anytime soon. So we can happily go from JavaFX to JavaScript and Back!

Enjoy. Let me know what you think.

References:

Pro JavaFX Platform by Jim Weaver, Weiqi Gao, Stephen Chin, and Dean Iverson
JavaFX: Developing Rich Internet Applications by Jim Clarke, Jim Connors and Eric J. Bruno
Essential JavaFX by Gail Anderson and Paul Anderson

numBalls

JavaFX to JavaScript and Back Part 1

Introduction

One of the most impressive features that I’ve seen relating to JavaFX, is the ability of an Applet to interact with the browser via JavaScript and HTML. The browser can also interact back with JavaFX code. There are plenty of examples out there but I’d like to add one more to the pile of cool examples. It may be cool using AJAX concepts with JavaScript & HTML, but using the concept with JavaFX is just amazing. The possibilities are endless. “JavaFX to JavaScript and Back Part 1” will demonstrate what the application will do and “JavaFX to JavaScript and Back Part 2” will be on steps on how-to do it.

While I was a kid growing up, I would go to the bowling alley to get a 25 cent(US) bouncy ball from the vending machine. I’ve lost many a bouncy ball in the parking lot from bouncing them as hard as I could. In this example I will create a 500 by 400 pixel sized bouncy ball containment field in JavaFX. This is to prevent them from ever leaving me like they did when I was a kid. 😦

Note: Thanks to Stephen Chin an author of the book Pro JavaFX Platform and WidgetFX for allowing me to host The Bouncy Ball Containment Field Click Here to run!

(Tip: If in Firefox just middle mouse click link to launch in another tab)

Initial Ball added to ball world

Here is an example of an HTML page with an embedded JavaFX applet with HTML form elements below for data input to create bouncy balls. The demo allows a user to specify the number of balls to add to the scene called the “Add balls to Scene” field.  When the “Add Ball(s)” button is pressed the JavaScript code will pass the number of balls to the JavaFX public script level function called addBalls() which will create bouncy balls. When balls are added the JavaFX Script code will talk back to the HTML read-only field called “Number of balls” to show the current number of balls in the containment field (Scene). On the JavaFX side of things the location, velocity, size and color of the balls will be generated randomly and rendered on the scene.  You should notice the new JavaFX 1.2 Toggle Button component on the upper left. It is used to stop and  start the animation of the bouncing of the balls (Timeline pause & play to be exact). The first use case scenario is add balls which depicts the JavaScript to JavaFX data flow. The second use case scenario is display the current number of bouncy balls in the containment field which depicts the JavaFX to JavaScript data flow.

Balls addBalls(lots of balls)

This shows when the user specifies a whole bunch of balls to add.

Button to use JavaScript function addBalls()

A ball can be removed from the scene by just clicking an individual ball.  The field “Number of balls” input field is really a read-only field that is updated from the JavaFX side whenever balls are added and removed from the bouncy ball containment field.

More Bouncy Balls

By adding many balls I wanted to see how well it would perform.

Tons of Bouncy Balls

Here I add balls, lots of balls! The bouncy ball containment field now holds 400 bouncy balls. Although I might not be doing things efficiently I noticed my CPU was performing adequately. The utilization was between 41% to 46% (older Dell hyper-threading Inspiron XPS laptop Pentium(R) 4 CPU 3.40 GHz) using Windows XP SP 3. It was a smooth animation with no flicker. The Ball class is a Custom Node which contains a Circle with an effect called Radial Gradient to give it a 3D sphere look.

Dragging JavaFX Applet out of Web Page

By using the Alt key along with mouse drag the JavaFX applet will appear to be pulled out of the browser’s Web page and out onto the desktop.

JavaFX Applet living outside of browser

By default, when you drag the applet out of the browser onto your desktop a small “close button” appears on the upper right corner of your application. When the user clicks the “close button” box the JavaFX applet will snap right back into the browser. Another thing to note is that when the JavaFX applet is running outside the browser and the user subsequently closes the browser the applet will remain running independent of the browser.   This introduces an interesting ability that adds a new dimension to usability on the desktop.  As the user becomes drawn into the application experience the need to be attached to the Web page will be obsolete. Another cool effect that I have added to the Application is transparency or opacity level when the mouse cursor is exiting or entering the scene area. When the user moves the mouse away from the application the screen will fade to a subtle transparency. When the user moves the mouse cursor into the application screen area the background becomes fully opaque (white in this case).

Fully Opaque when mouse moves into application

Fully Opaque when mouse moves into application

This fading effect helps the user transition from one application to another.

The last, item of the desktop experience to mention is the Java JNLP mechanism that asks the user if he or she wants to create a short-cut icon for the application to launch at a later time.

Create short-cut dialog

Create short-cut dialog

To reproduce the dialog asking for a shortcut, you would drag the applet out of browser, then close tab or browser application and then a dialog will appear asking to create the short-cut.

Conclusion

Building the bouncy ball containment field was extremely fun. I learned a lot about boundsInParent which taught me that it is the rectangular region after all transformations to the node has been applied when adding balls to the Scene. As the future of the Web 2.0 apps grow users will demand richer interfaces and better content. I believe JavaFX has made great strides in desktop development and also increasing the usability factor of desktop applications by leaps and bounds. In Part 2 of “JavaFX to JavaScript and Back” I will detail a step-by-step tutorial on how to build the JavaFX applet you see here. Let me know what you think. Feedback is always welcome!