Creating A Sci-Fi JavaFX World Clock @foojay.io

foojay.io

foojay.io

It has been awhile since I last blogged on CarlFX and I want to let my readers (you) know that I will mainly be blogging over at the new foojay.io site. What is foojay you may ask?

“Welcome to foojay, a place for friends oOpenJDK. Foojay’s user-focused Java and OpenJDK technical dashboards provide free data for daily Java developers. At the click of a button, you have access to updated analyses, selected highlights, and categorized lists arranged for easy consumption on all things Java.”

https://foojay.io/about/

In other words, it’s a community driven site where beginners to advanced Java developers will be able to collaborate and learn about all things Java. There, you’ll be able to learn from experts and Java Champions that discuss topics such as Java, JavaFX, Gaming, Microservices, Security, IDEs, Embedded, IoT, Cloud, etc. Foojay online also has tools that allow you to explore features and command options between Java releases.

What about CarlFX?

While I will be spending more time over at foojay.io I still plan to continue my existing work as time allows to just blog about interesting topics such as programming, algorithms, math, art, AI, gaming, science and design.

Creating a JavaFX World Clock from Scratch

Many of us these days are working from home. Most likely you will be using video chat to talk to co workers possibly around the world. Unfortunately there are many times when I lose track of time and do not realize the time difference while chatting with my co-workers. So in response to this problem I thought of creating a cool looking sci-fi world clock using JavaFX on the new Java 16 JDK.

The blog series are hosted on the foojay.io site if you are interested in following along. The blog series are still a work in progress (Part 1-6). Links will be available when they are published.

Looking forward to getting back into the swing of blogging again and connecting with all of you!

Science Fiction User Interfaces with JavaFX Part 1

Sci-Fi UI Shaped Window created using JavaFX

Can Fictional UIs become a Reality?

Growing up as an 80’s kid I’ve seen my share of science fiction movies that really inspired me to become quite fond of graphical user interfaces (GUIs) especially the idea of trying to make science fiction UIs possible in the real world. In this and a series of blog posts I want to try (attempt) to answer the question “Can Fictional UIs become a Reality?”

Since I am experimenting with different ideas (implementations) of what a sci-fi UI should look and behave  like, I won’t know exactly how many parts this blog series will be. So I hope you will join me in this journey towards the creation of a prototype and API capable of making science fiction UIs a reality. You might be wondering if there is something (UI framework) that already exists.

Shouldn’t we just use UI frameworks that already exist?

If you’re familiar with the excellent post from Jeff Atwood’s 2006 article “This Is What Happens When You Let Developers Create UI“. He talks about how most software developers aren’t really good at creating UIs. Is this really true? While I agree with most of his statements, I still believe anyone with enough passion will figure out a way to achieve their intended goal (within reason of course). As for me, most of my design choices are mainly through trial and error. I think UI design is very much like clothing where designs can be either trendy or classical.

Through the years many designers have made UI frameworks to build UIs that look great and are extremely functional, however they can look rather primitive (IMO) compared to the science fiction UIs that we see in movies today. When going the other direction science fiction UIs may look futuristic, but they don’t exactly map to anything real or functional.

Assuming you’re a developer (with some UI skills) and wishes to build sci-fi UIs the next section I’ll talk about what a sci-fi UI might look like or how it might behave.

Look and Feel Requirements

The following are features a typical science fiction UI window might have:

  • Create any shaped window (for now use line segments)
  • Style the visible shaped frame around the window
  • Create mouse a listener to define areas to resize & move window on the desktop
  • Resize the window using 8 directions (NW, N, NE, E, SE, S, SW, W)
  • Animate window and contents when entering and exiting the desktop (area)
  • Create Clipped region to display content such as video, 3D, Pane

Conclusion

As a kid I remember how my mind was simply blown away when I had seen futuristic and technologically advance civilizations on the big screen. Looking back at old sci-fi movies you will immediately realize how cheesy they were compared to today’s movies.

Hopefully I’ve given you compelling reasons why I would like to create such an API that would enable developers to easily style and create Sci-Fi looking UIs. As a developer/designer I would like to bridge the gap between Sci-Fi UIs and real UIs by listing some general requirements to start things off.

As always feel free to comment and let me know what you think.

Happy coding.:-)

References

Jeff Atwood’s 2006 article “This Is What Happens When You Let Developers Create UI
Chris Noessel on “How Design in Sci-Fi and the Real World Influence Each Other
Carl Dea’s video “JavaFX demo of a Sci-fi UI HUD Window

Animated Effects through JavaFX Callouts

In this article you will learn how to use JavaFX’s animation APIs to create callouts. You can see a demo of these callouts in action on my Youtube channel at https://www.youtube.com/watch?v=XTHbB0LRdT4.

callout_demo

What Is a Callout?

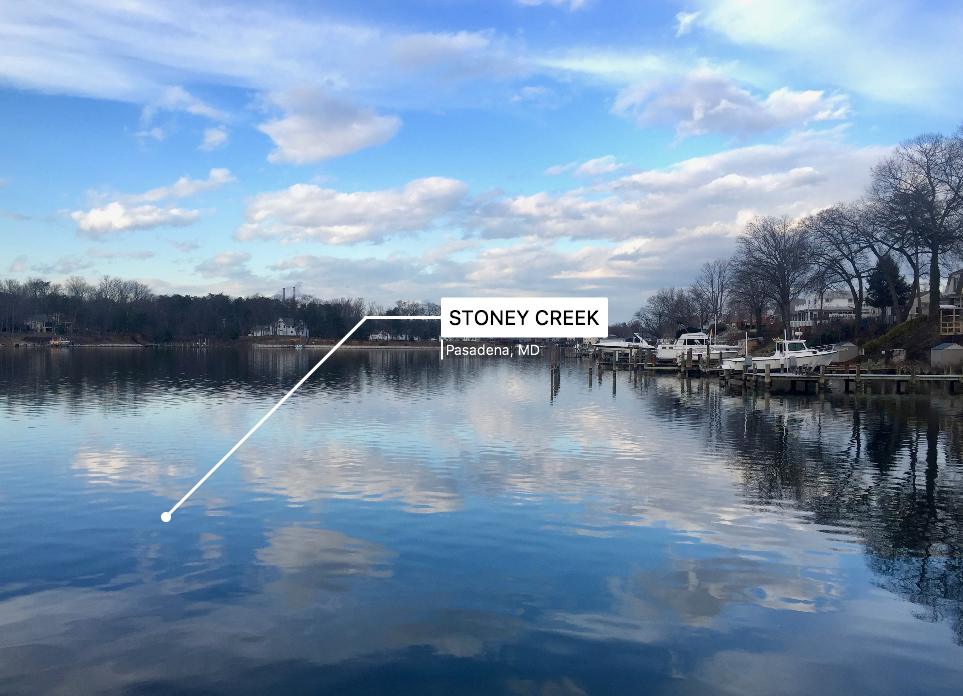
I’m sure you’ve seen commercials or sci-fi movies using callouts appearing over the top of an image to indicate objects in a scene. In this article, you will learn how to use JavaFX’s Animation APIs to create an animated callout effect. Using such effects, you can place text into a scene, and connect the text to an item of interest through a line or an arrow.

Figure 1 shows the pieces that combine to make up a callout in the context of this article.

callout_descr

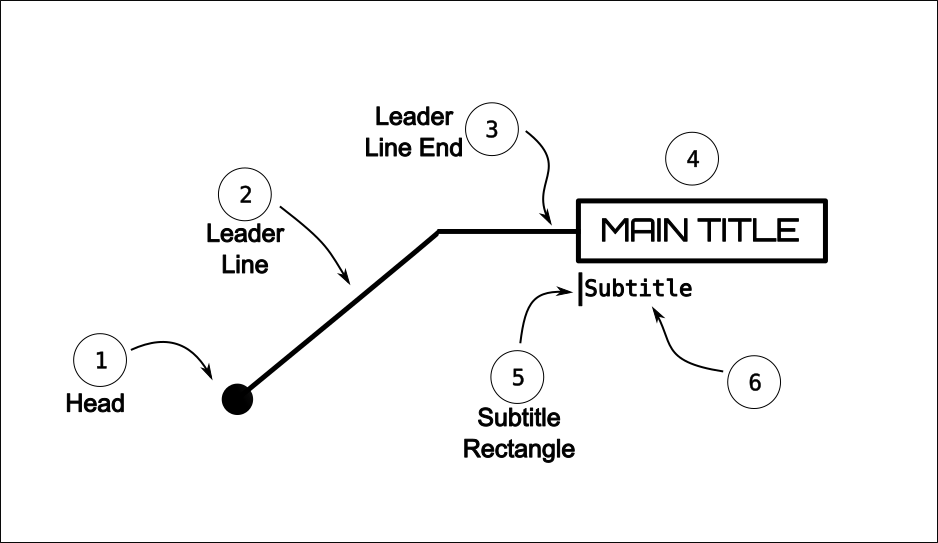
Figure 1. The different pieces of a typical callout

Following are the definitions of the various pieces shown in Figure 1:

  • Head – A point (circle) indicating an item in the image
  • Leader line – A line drawn from the head to another point usually to form a diagonal
  • Leader line end – The end part of the leader line segment (horizontal line)
  • Main Title – The main title text. The main text begins to scroll at the leader line’s end point
  • Subtitle Rectangle – A little animated rectangle coming from the bottom of the Main Title
  • Subtitle – The sub title text. The subtitle text will underneath the main title text

Not all callouts are the same. Most though, will have the majority of these elements.

While a callout typically points things out in books or magazines in a static way, it is much much better in a video if we can animate the callout. A nice, animated effect is to begin by drawing a point (head), then tracing a line (leader line), then scrolling a main title, and finally scrolling a subtitle. As the animation finishes being displayed, it can pause for a moment (just enough to allow the viewer to read the title texts) before reversing the whole process as a way to exit the scene.

Animating a Callout

Now that you know what makes up a callout, we can jump into some JavaFX code to animate each of the pieces (1-6) shown in Figure 1. If you are unfamiliar with the basics of animation using JavaFX, please check out the book JavaFX 9 by Example, and especially look at chapter 7 on Graphics. To see the full source code listing for this article please visit Github here.

Since each piece of the callout is animated in a sequence, you’ll begin by creating a javafx.animation.SequentialTransition instance. A SequentialTransition holds zero to many Animation objects. Here’s how to create one:

     SequentialTransition calloutAnimation = new SequentialTransition();

As the name implies, the animations will occur in a sequence. Additional things you’ll want to set on the calloutAnimation are the cycle count and the auto reverse properties. For example:

   // Allow animation to go in reverse
   calloutAnimation.setCycleCount(2);
   calloutAnimation.setAutoReverse(true);

The above settings enable the animation to reverse the sequence after the reader has had time to view and absorb the callout. To add animations you invoke the .getChildren().add() method on the sequential transition animation object. Following is code to add the head animation to the sequential transition animation object.  The method buildHeadAnim() returns a javafx.animation.Animation instance.

   // Animation of head
   Circle head = new Circle(600, 550, 5); // center x, y, radius
   head.setFill(Color.WHITE);
   calloutAnimation.getChildren().add(buildHeadAnim(head));

Head Animation

You can use any shape such as a rectangle or a circle when creating an animation for the head. In the example coming next, the head is a JavaFX Circle shape. The animation begins with a zero radius, and scales to a larger radius. The method shown creates and returns a javafx.animation.Timeline object.

protected Animation buildHeadAnim(Node head) {
   Circle headCircle = (Circle) head;
   return new Timeline(
      new KeyFrame(Duration.millis(1),
         new KeyValue(headCircle.visibleProperty(), true),
         new KeyValue(headCircle.radiusProperty(), 0)
      ), // start value
      new KeyFrame(Duration.millis(300),
        new KeyValue(headCircle.radiusProperty(), 5.0d)) // end value
   );
}


The timeline consists of an initial keyframe that sets the head circle’s visible property to true, and its radius property to zero. Next, the end key frame is defined with key values to interpolate the radius property from zero to 5.0 for 300 milliseconds.

Leader Line Animation

When animating the leader line, the line will appear as if it is being traced or drawn with a pencil. In the code below, the end point coordinates are interpolated (linear). A line is drawn from the head’s center (600, 550) to the lineToPoint coordinate (400, 300). I hard coded the values to keep the code more concise. The actual key values for the endX/endY are parameterized as getLeaderLineToPoint().getX() and getLeaderLineToPoint().getY() respectively.

protected Animation buildBeginLeaderLineAnim(Line leaderLine) {
   return new Timeline(
      new KeyFrame(Duration.millis(1),
         new KeyValue(leaderLine.visibleProperty(), true)),// show
      new KeyFrame(Duration.millis(300),
         new KeyValue(leaderLine.endXProperty(), 400),
         new KeyValue(firstLeaderLine.endYProperty(), 300)
      )
   );
}


Leader Line End Animation

Since the code to animate the end part of the leader line you’ll notice it is very similar to previous animation so, I will omit the code. To see the full listing please visit: https://github.com/carldea/callouts/tree/master/src/com/carlfx/callouts.

Main Title Text Animation

The main title text animation consists of an HBox containing a Text node that will appear to scroll left or right depending on the direction of the leader line’s end point. For example, if the leader line end point’s direction is pointing toward the right, then the main title text will appear to scroll to the right.

Below is the buildMainTitleAnim() method responsible for animating the main title text. Being that this method is the most complex part of the callout animation I wanted to share some tips and tricks that I encountered along the way.


protected Animation buildMainTitleAnim(HBox mainTitleBackground) {
     // main title box
    // Calculate main title width and height upfront
    Rectangle2D mainTitleBounds = getBoundsUpfront(mainTitleBackground);

    double mainTitleWidth = mainTitleBounds.getWidth();
    double mainTitleHeight = mainTitleBounds.getHeight();

    // Position mainTitleText background beside the end part of the leader line.
    Point2D endPointLLine = calcEndPointOfLeaderLine();
    double x = endPointLLine.getX();
    double y = endPointLLine.getY();

    // Viewport to make main title appear to scroll
    Rectangle mainTitleViewPort = new Rectangle();
    mainTitleViewPort.setWidth(0);
    mainTitleViewPort.setHeight(mainTitleHeight);

    mainTitleBackground.setClip(mainTitleViewPort);
    mainTitleBackground.setLayoutX(x);
    mainTitleBackground.setLayoutY(y - (mainTitleHeight/2));

    // Animate main title from end point to the left.
    if (LEFT == getEndLeaderLineDirection()) {
        // animate layout x and width
        return new Timeline(
           new KeyFrame(Duration.millis(1),
              new KeyValue(mainTitleBackground.visibleProperty(), true),
              new KeyValue(mainTitleBackground.layoutXProperty(), x)
           ), // show
           new KeyFrame(Duration.millis(200),
              new KeyValue(mainTitleBackground.layoutXProperty(), x - mainTitleWidth),
              new KeyValue(mainTitleViewPort.widthProperty(), mainTitleWidth)
           )
        );
    }

    // Animate main title from end point to the right
    return new Timeline(
       new KeyFrame(Duration.millis(1),
          new KeyValue(mainTitleBackground.visibleProperty(), true)), // show
       new KeyFrame(Duration.millis(200),
             new KeyValue(mainTitleViewPort.widthProperty(), mainTitleWidth)
       )
    );
}

Finding the Main Title (Bounds) Upfront

Your code will need to know upfront the size of the bounding region when positioning the main title text. Following is a method that takes an HBox containing a Text node, then calculates the HBox’s width and height without the box having to be shown on the main scene graph.

protected Rectangle2D getBoundsUpfront(Region node) {
    // Calculate main title width and height
    Group titleRoot = new Group();
    new Scene(titleRoot);
    titleRoot.getChildren().add(node);
    titleRoot.applyCss();
    titleRoot.layout();
    return new Rectangle2D(0, 0, node.getWidth(), node.getHeight());
}

You can see in this example how the applyCss() and layout() methods from the javafx.scene.Node class are responsible for figuring out the width and height after CSS styling has been applied. Above you’ll notice a Scene is temporarily created.

Subtitle Animation

For brevity, I’ve omitted the subtitle animations. I trust you will look at the full code listing that I referred to earlier on Github. The subtitle animations all follow the same pattern as the title animations in terms of the initial start of the animations and interpolating to end key values.

Playing Callout Animation

Assuming your nodes that make up a callout are added to a JavaFX Pane layout node, you need to stop the sequential animation calloutAnimation. Then you’ll need to initialize all nodes to not be shown (visible property set to false). Lastly you’ll need to invoke the play() method.

   getChildren().addAll(head,
      firstLeaderLine,
      secondLeaderLine,
      mainTitle,
      subTitleRect,
      subTitle);

   calloutAnimation.stop();
   getChildren().forEach(node -> node.setVisible(false));
   calloutAnimation.play();


Conclusion

By using JavaFX’s animation API and simple shapes it was pretty easy to create animated callouts. In this article you learned how to use a SequentialTransition object responsible for invoking smaller animations (Timeline) sequentially.

Building each step of the callout each Timeline animation would use keyframes that interpolated over key values based on a shape’s properties such as a circle’s radius. After, learning about how to animate the leader line you also learned a neat trick that helped determine the main title text size via the applyCss() and layout() methods. Because of styling and font sizing it is difficult to know a UI component’s size until it is rendered onto the main scene graph.

Now that you know how to implement an animated callout I trust you will make applications more engaging. Happy coding!


A JavaFX HelloWorld using Java 9’s Project Jigsaw in 60 seconds

Updated! 4/2/2017 * The latest update of the JDK 9 updated the –module-path switch.

By now you’ve probably have heard of Java 9’s new module system a.k.a. project Jigsaw. If you don’t know about Java 9’s new module system, you should visit Mark Reinhold’s paper on The State of the Module System. Also, you should check out @nipafx Nicolai Parlog’s excellent blog at http://blog.codefx.org There he goes into great detail about Java 9’s new module system and many scenarios.

In this article I will attempt to show you how to create a JavaFX Helloworld application using Java 9’s module system in 60 seconds.

Requirements

As of this writing Java 9 is still in the early access phase which means you’ll need to grab the latest builds at http://jdk.java.net/9/

  • JDK 9 EA build 162 or greater (JDK 9 EA)

Instructions

Assuming you’ve installed your JDK and have the appropriate environment variables set. Also, you’ll want to get to the command prompt or terminal and type: java -version to verify the installed JDK. Eg.

Java 9 early release build 162.


Step 1: Create a directory in your home directory for your project such as the following for Windows OS, Linux, and MacOS respectively. Also, create a src directory under your helloworld project directory.

  # Windows
  c:\Users\myusername>md helloworld
  c:\Users\myusername>md helloworld/src
  
  # Linux
  /user/home/myusername $ mkdir -p helloworld/src

  # Mac
  /Users/myusername$ mkdir -p helloworld/src


cd helloworld  

Step 2: Create a directory using a simple naming convention based on Java 9’s new way to organize source code and modules.

Create a directory named as your module eg: com.mycompany.helloworld. Assuming your current directory is <User’s Home dir>/helloworld/

   mkdir src/com.mycompany.helloworld

Step 3: Create directories based on your package namespace of the HelloWorld.java file. In this simple example the main Helloworld.java will be created using the following directory structure:

 mkdir -p src/com.mycompany.helloworld/com/mycompany/helloworld

The directories should look like the following:

        <User Home dir>/
              helloworld/
                 src/
                    com.mycompany.helloworld/
                       com/
                          mycompany/
                             helloworld/

Step 4:  Create a module-info.java file. This lets the compiler know which core module dependencies the application needs to compile and run such as javafx modules. Create a file named module-info.java under the directory helloworld/src/com.mycompany.helloworld. Copy and paste the code below into the module-info.java file. Use vi, nano or notepad.

module com.mycompany.helloworld {
   requires javafx.controls;
   exports com.mycompany.helloworld;
}

The module-info.java defined above used to have modules javafx.base and javafx.graphics, however thanks to Abhinay Agarwal who pointed out that they are transitive dependencies and don’t need to be added because they are already included when using the javafx.controls module.

Step 5:  Create the HelloWorld.java application file. The file will be created in the directory helloworld/src/com.mycompany.helloworld/com/mycompany/helloworld/ . Copy and paste the code below into the HelloWorld.java application.

package com.mycompany.helloworld;

import javafx.application.Application;
import javafx.event.ActionEvent;
import javafx.event.EventHandler;
import javafx.scene.Group;
import javafx.scene.Scene;
import javafx.scene.control.Button;
import javafx.stage.Stage;

/**
 * A JavaFX Hello World
 */
public class HelloWorld extends Application {

   /**
    * @param args the command line arguments
    */
    public static void main(String[] args) {
       Application.launch(args);
    }

    @Override
    public void start(Stage stage) {
       stage.setTitle("Hello World");
       Group root = new Group();
       Scene scene = new Scene(root, 300, 250);
       Button btn = new Button();
       btn.setLayoutX(100);
       btn.setLayoutY(80);
       btn.setText("Hello World");
       btn.setOnAction( actionEvent ->
                 System.out.println("Hello World"));
       root.getChildren().add(btn);
       stage.setScene(scene);
       stage.show();
    }
}

Step 5:  Compile the source code with the -d option with the location of compiled module. The directory for the new helloworld module is mods/com.mycompany.helloworld .

javac -d mods/com.mycompany.helloworld src/com.mycompany.helloworld/module-info.java src/com.mycompany.helloworld/com/mycompany/helloworld/HelloWorld.java

Step 6:  Execute the Hello World application as a module. After compiling the module into the mods directory you will now use Java 9’s new –module-path option to specify the compiled module’s directory. Also, you will specify the -m option to execute the module and its main class HelloWorld. Use the following command:

java --module-path mods -m com.mycompany.helloworld/com.mycompany.helloworld.HelloWorld

The output of the previous command:

Screen Shot 2016-04-26 at 1.42.13 AM


Conclusion

Not sure if you’ve taken more than 60 seconds, but assuming your environment is setup and the JDK 9 is installed you should be able to cut and paste the code in seconds. I find the new Java 9 module system pretty straight forward. Although there is a little extra typing in order to let the compiler know where modules are, it’s really not that different than the -classpath option.

I can see how large projects can break apart components as modules and benefit from it.  I believe these are truly exciting times in the Java world because tools will be able to build thin executables, thus faster load times. I feel it’s been a very long time coming, but a very needed feature that will encourage us to write, manage and deploy modular software.

References:

Project Jigsaw: Module System Quick-Start Guide: http://openjdk.java.net/projects/jigsaw/quick-start

Java Platform, Standard Edition Oracle JDK 9 Migration Guide: https://docs.oracle.com/javase/9/migrate/toc.htm

Project Jigsaw: http://blog.codefx.org/tag/project-jigsaw/

The State of the Module System: http://openjdk.java.net/projects/jigsaw/spec/sotms/


Shadow Fields vs. Property Accessors Interface Round 3

This is round 3 of the Shadow Fields vs Property Accessors Interface. If you are new and not sure what the fuss is about please check out my previous post or my first post on the topic of saving memory when developing JavaFX applications. As a Java developer my main concern is having a good balance between performance, memory usage and lowering boilerplate code (ease of API use) when developing JavaFX domain models. Usually, application frameworks provide a model view controller(MVC) or presentation model pattern to separate UI code from domain objects. In fact what comes to mind is that domain model type objects should be easy to create or generated (IDEs). In this blog entry you will see results of Round 3 with two parts. Part 1 was implemented using an idea from Marcel Heckel and Part 2 is an implementation that I eventually settled with based on performance, memory usage and ease of use.

Disclaimer: Use any of the code at your own risk. This is purely experimental and should not be used in production. This is a work in progress.

The latest code is here —> [PropertyAccessors interface]

Recap of Round 2

Although, the last round (round 2) indicated that my Property Accessors strategy was slightly better in memory consumption than the standard (fat) property objects strategy, it was still disappointing in terms of performance when creating 2,000,000 objects of an Employee type class having native type objects. I still was not happy with the memory usage of my round 2 implementation compared to Dirk’s implementation. If you just care about my final results of Round 3 just skip to the Results section.

Because, there might be a new Round please check out the current code here  if you decide to use it or assuming Dirk decides to accept my pull request head over to his Github account here. 😉

In round 2, I used a hash map lookup that can be quite slow as more and more fields are added with a O(1) time complexity (search). Interestingly, Marcel Heckel commented to suggest a simple approach of creating an indexed array of objects which will not not only save more memory but will be much faster. Compared to a key/value pair lookup a direct index access to a field is definitely the way to go. Although, Marcel’s code is faster, it still takes up more memory than Dirk’s Shadow Fields code. The extra memory is actually taken up by the preallocating of an array that will hold the values for the each field. Even if they are all nulls the array itself is created for each employee object. I implemented Marcel’s strategy here (line 23). Let’s look at the results of the array of indexed fields strategy.

Part 1: Using an Array of Indexed Fields

private final Object[] modelProperties =
                               new Object[FIELDS.values().length];
    public Object[] getModelProperties(){
        return modelProperties;
    }

TEST: Objects Not Using Property Fields

Shown below is using a mix of Marcel’s indexed array idea and my way of specifying the property name using enum types to denote fields as property fields.

Screen Shot 2016-04-07 at 12.18.01 AM

Objects that aren’t using JavaFX properties compared to standard (fat) objects with all fields as JavaFX properties. This implementation uses an array index for each field and an array to hold each value.

Above you will notice the check box is unselected to indicate not to create JavaFX properties on the domain object (not using the xxxxProperty() methods). You’ll notice that the performance has dramatically increased compared to round 2’s code and memory usage also reduced. In the figure above the Property Accessor interface is at 16MB more than the Shadow Fields’ pattern implementation. In part 1 of thin objects performance and memory usage Shadow Fields is the clear winner. However, Shadow Fields is still not as clean to implement. Another thing to note is that Property Accessors interface is just shy of 14 milliseconds for 2 million objects! As we’ll see later in Part 2 Bringing back Private Instance Variables as Fields the Property Accessors interface will really shine with memory usage.

TEST: Objects Using of Property Fields

The following is the results when all fields of an object is using JavaFX properties.

Screen Shot 2016-04-07 at 12.24.22 AM

Objects that are using JavaFX properties compared to standard (fat) objects with all fields as Javafx properties. This implementation uses an array index for each field and an array to hold each value.

Here, you’ll notice the Accessor columns (Property Accessors interface) at 2 million objects performs at 916 milliseconds with a 576 MB use of memory. In this case the standard (fat) object is the winner as far as memory space at 544 MB. Shadow Fields wins on performance on every round so far.

One minor detail with Marcel’s code example (in the comments section) is it doesn’t take into account the string name of the property when creating a new property object instance. For example the following statement shows the variable totalProperty with the property named ‘total‘ which matches the totalProperty() method. Firing the name of a property during change is important for reading code, testing and tooling.

Property totalProperty = new SimpleIntegerProperty(this, “total”, new Integer(5));

To have both a named field and an index like Marcel’s idea, I simply created an enum declaring each field property. These enums are created on the Employee class.

// Part 1 implementation
public class EmployeePropertyAccessor implements PropertyAccessors{
    public enum FIELDS {
        name,
        powers,
        supervisor,
        minions
    }
    private final Object[] modelProperties =
                               new Object[FIELDS.values().length];

    public Object[] getModelProperties(){
        return modelProperties;
    }

    // The rest of the code...

Above you will notice how the model Properties array will be created based on the number of defined fields (enum FIELDS). I use the FIELDS.value().length to define the size of the array. Also, the PropertyAccessors interface (Part 1’s implementation) forces the developer to implement the getModelProperties() method. Here, I just returned the modelProperties‘ reference to an array of objects. It isn’t very pleasant to ‘have to‘ implement an array and a getModelProperties() method .

In part 2, of this article, I implemented things differently where the developer isn’t forced to implement a modelProperties array and a getModelProperties() method. I will solve this issue where the code will look much cleaner and performant (user of the API’s perspective).

Part 2: Reintroducing Instance Variables

Part 2, I will be adding private instance variables back into the Employee class (EmployeePropertyAccessor) to hold the field values instead of an array like in Part 1. My idea was to have a field variable be mutually exclusive to either point to a native object type or a JavaFX property, thus saving memory compared to the Shadow Field pattern code. Since, the Shadow Fields code uses two variables to represent a field value, it will have an extra reference which will inevitably increase its memory when the object uses properties. As you can see below the code will look similar to part 1, but also will have a static block to register the property fields in the class. This is important because some instance variable you may not want participate as JavaFX properties.

// Part 2 implementation
public class EmployeePropertyAccessor implements PropertyAccessors {

    private Object name;
    private Object powers;
    private Object supervisor;
    private Object minions;

    enum FIELDS {
        name,
        powers,
        supervisor,
        minions
    }

    static {
        // register fields one time.
        // (Warning: enum's ordinal value is reassigned an index number)
        registerFields(EmployeePropertyAccessor.class, FIELDS.values());
    }

    public EmployeePropertyAccessor(String name, String powers) {
        setName(name);
        setPowers(powers);
    }

    public final String getName() {
        return getValue(FIELDS.name, "");
    }
    public final void setName(String name) {
        setValue(FIELDS.name, name);
    }
    public final StringProperty nameProperty() {
        return refProperty(FIELDS.name,
SimpleStringProperty.class, String.class);
    }

    // The rest of the code...

The code listing above does some interesting magic when calling the registerFields() method. The FIELDS enums’ ordinal values are reassigned using reflection giving each a new id as an index into an array. This provides immutable enums while also containing a unique identifier for each field to be accessed fast via an index. Since enum are used to represent fields to be used as properties, the ordinal values are meaningless in other contexts. This means: Who cares, if the ordinal value is reassigned on these declared enums? They are only used for this purpose only ‘to register fields‘.

TEST: Objects Not Using Property Fields [NEW]

Shown below is the test results using the new implementation of the Property Accessors interface API. The test below shows when not using property fields compared to the standard fat object.

Screen Shot 2016-04-09 at 12.29.32 PM

A test that compares standard objects (all fields using properties) vs objects using native objects. Property Accessors interface API now uses instance variables as fields instead of a reference to an array.

As you can see above the new implementation of the Property Accessors interface is the clear winner for memory usage and ease of use. The performance is slightly slower than part 1’s implementation but the savings in memory is worth it. You’ll notice that the Shadow Fields’ memory usage is 16 MB more than Property Accessors’ usage.

TEST: Objects Using of Property Fields [NEW]

Shown below is the test results using the new implementation of the Property Accessors interface API. The test below shows when using property fields compared to the standard fat object. (The check box is checked underneath the Start button)

Screen Shot 2016-04-09 at 12.36.02 PM

Results of Round 3

Below are bar charts I threw together based on the results in the tables. I felt people like to see charts instead of tables, cells and text. 😉

performance_a

Test results of performance when objects aren’t using JavaFX properties. Smaller number (in milliseconds) is better.

performance_b

Test results of performance when objects are using JavaFX properties. Smaller number (in milliseconds) is better.


memusage_a

Test results of memory usage when objects are not using JavaFX properties. Smaller number (in megabytes) is better.


memusage_b

Test results of memory usage when objects are using JavaFX properties. Smaller number (in megabytes) is better.


Conclusion

Based on the results my goal was definitely achieved (IMHO) where I originally wanted code to be simple to read and easy to implement when objects may or may not use JavaFX properties (with the added benefit of saving memory when fields aren’t using JavaFX properties [native types]). Although, performance-wise Shadow Fields won on all of test runs, Property Accessors interface wasn’t far behind. When not using properties Property Accessors interface  beats the Standard object strategy by a mere 5 milliseconds when creating 2 million records.

When it comes to memory usage with creating 2 million objects and when the strategies were  not using properties as fields, the Property Accessors interface is clearly the winner with a savings of at least 16MB compared to the Shadow Fields pattern and a 240MB savings compared to the Standard Properties code. Last, but not least is the results when objects are using properties as fields, Property Accessors interface ties with the Standard objects strategy regarding memory consumption. The Shadow Fields strategy uses is at least 20MB more than the other strategies.

Even though Properties Accessors interface is slightly slower (by a small difference in milliseconds) when using or not using all fields as properties for 2 million objects, I am convinced the API can be used on any JavaFX application size for the ease of development of domain models and objects. I encourage others to test the code themselves before making the decision to use the API. Please be advised that the code isn’t considered production ready and is very experimental. This is a work in progress, so until I get to eat my own dog food (at work) I can’t really recommend that you use the Property Accessors API. I’ll restate the disclaimer below:

Disclaimer: Use any of the code at your own risk. This is purely experimental and should not be used in production. This is a work in progress.

Feel free to comment and subscribe. Enjoy and happy coding!

-Carl

@carldea
https://carlfx.wordpress.com


Shadow Fields vs. Property Accessor Interface Round 2

If you guys haven’t noticed a (light-hearted) showdown between Dirk Lemmerman and me, let me quickly mention how we got to this point. For starters, Dirk created a JavaFX tip 23: “Save Memory Shadow Fields for Properties” to help application developers save memory when using JavaFX Properties. Pretty impressive knowing that you can save memory when objects aren’t needing to use JavaFX Property objects.

While looking at the code I couldn’t help but notice boilerplate code that drove me bonkers, so I decided to make a simple API that also took into account the interesting Shadow Fields pattern used by Dirk’s example. The API I created aka Property Accessor Interface comprises of default methods that easily allows developers to implement the interface as opposed to extending an abstract class to avoid Java’s single inheritance rule. To see the Property Accessor interface code I blog about it here. To my surprise Dirk created yet another blog entry to benchmark all three approaches. Below is the chronological order of the blog posts thus far if you are keeping up with all the fun.

  1. Save Memory Shadow Fields for Properties by Dirk Lemmerman
    Introducing the concept of Shadow Fields
  2. JavaFX Tips to Save Memory! Shadow Fields for Properties and Observables by Carl Dea
    My attempt to save memory and reduce boilerplate code.
  3. Shadow Fields vs. Property Accessor Interface by Dirk Temmerman
    A benchmark application to test the three approaches of objects having properties and raw datatypes for fields.
  4. Shadow Fields vs. Property Accessor Interface Round 2 by Carl Dea
    A revisit of the Property Accessor Interface to reduce the memory usage by centralizing a map of values.

As it turns out my implementation was the worst of the three even with the bloated object with already instantiated property fields according to post #3 above. 😦 Because I rushed into things and didn’t know the issue until Dirk’s post #3 above. Well, I’m not ready to wave the white flag and besides I still have a few tricks up my sleeve.

Next, you will get to see what I did to reduce the memory usage of the Property Accessor interface strategy. To see the code changes please see the code at the Github here. The only change I made was centralizing the Map containing the values. As you can see below the memory is much lower compared to Dirk’s post #3 above. However, event though I didn’t beat Dirk’s implementation using shadow fields I did slightly better than the standard object approach.

An updated Property Accessor Interface implementation using a centralized map.

An updated Property Accessor Interface implementation using a centralized map.

Conclusion

Although I’ve only made a simple change by removing the hash maps from every object and centralizing all values to a single map the Property Accessor interface still didn’t trim memory as low as the Shadow fields technique. I may explore other techniques such as weak references or take a look into memory mapped files. I doubt I can reduce things any further, but I believe a relatively small to medium application could use the Property Accessor interface to rapidly build apps. They (developers) could use proper pagination to avoid large lists. One last idea would be to create an annotation that could even reduce the boiler plate code.

Let me know ow what you think? Any suggestions?

JavaFX Tips to Save Memory! Shadow Fields for Properties and Observables

A TreeTable control holding employees.

A TreeTable control holding employees.

   In the world of JavaFX the Properties API allows UI developers to bind values to UI controls. This capability is surprisingly easy, however when object models use properties too often an application can quickly run out of memory. I usually will write two separate objects such as a pojo class and a presentation model object. This technique is often used in Swing based applications. From a  JavaFX perspective, you could just create one object with properties to allow observers (listeners) to update values. This sounds fine right? Not exactly because the main issue is when all of the object’s (pojo) attributes (fields) are properties which also wrap actual values the programmer (user of the api) may not want to bind or use properties at all, but only want to access the actual values. So, what is a JavaFX developer to do?

I often go to the blog Pixel Perfect by Dirk Lemmermann who will often post very useful JavaFX tips. Recently, Dirk blogged about how to save memory using an interesting pattern called Shadow Fields.  To see his post please visit his blog entry JavaFX Tip 23: Save Memory! Shadow Fields for Properties.. Dirk’s JavaFX tip does help solve the problem mentioned above (lessening the heap), however I noticed boilerplate code that has to exist to provide (a smart determination) to the caller of whether the return is the actual object or the property wrapper object. For example, instead of returning an IntegerProperty object when calling get or set methods, the code will return an int or Integer value, thus saving memory. Furthermore, the code declares two variable to hold one of the two value types. For example:

private String _title = "Untitled"; // shadow field
private StringProperty title;

I felt I could make things more concise and possibly saving more memory. And reducing the boilerplate code. I decided to create an interface with Java 8’s default methods that will handle managing actual values and properties. The user of the API will simply create a domain class that implements the following interface:

Interface PropertyAccessors

An interface providing accessor methods to provide smart determination of actual object value or the JavaFX property wrapper object. The user of the API must implement one method called getModelProperties() which returns a Map of property name (String) and value (Object). The value can be an actual object or a Property type object. The code below also will support Observable lists.

package com.jfxbe;

import javafx.beans.property.Property;
import javafx.collections.FXCollections;
import javafx.collections.ObservableList;

import java.lang.reflect.Constructor;
import java.util.ArrayList;
import java.util.List;
import java.util.Map;

/**
 * Provide default methods to support the similar
 * capability of the shadow fields pattern.
 * To save memory object values don't have to be
 * wrapped into a Property object when using getters
 * and setters, however when calling property type methods
 * values will be wrapped into a property object.
 *
 * Default methods for Observable lists are provided too.
 *
 * Created by cpdea on 4/3/16.
 */
public interface PropertyAccessors {

    Map<String, Object> getModelProperties();

    default <T> T getValue(String name, Object defaultVal) {
        Object p = getModelProperties().get(name);
        p = p==null ? defaultVal : p;
        return (T) ((p instanceof Property) ? ((Property) p).getValue(): p);
    }

    default void setValue(String name, Object value) {
        Object p = getModelProperties().get(name);
        if (p instanceof Property) {
            ((Property)p).setValue(value);
        } else {
            getModelProperties().put(name, value);
        }
    }

    default <T> T refProperty(String name, Class propClass, Class rawValType) {
        Object p = getModelProperties().get(name);
        Property prop = null;

        try {

            if (p == null) {
                Class[] constructorTypes =
                        new Class[]{Object.class, String.class};
                Constructor<Property> propConstr =
                        propClass.getDeclaredConstructor(constructorTypes);
                prop = propConstr.newInstance(this, name);
            } else if (rawValType.isInstance(p)) {
                Class[] constructorTypes = new Class[]{Object.class,
                        String.class, rawValType};
                Constructor<Property> propConstr =
                        propClass.getDeclaredConstructor(constructorTypes);
                prop = propConstr.newInstance(this, name, p);
            } else {
                prop = (Property) p;
            }
            getModelProperties().put(name, prop);
        } catch (Exception e) {
            e.printStackTrace();
        }
        return (T) prop;
    }

    default <T> List<T> getValues(String name, List<T> defaultValue) {
        Object p, o = getModelProperties().get(name);
        p = o;
        o = o==null ? defaultValue : o;
        if (!o.equals(p)) {
            getModelProperties().put(name, o);
        }
        return  (List<T>) o;
    }

    default <T> void setValues(String name, List<T> newList) {
        Object list = getModelProperties().get(name);
        if (list == null || !(list instanceof ObservableList)) {
            getModelProperties().put(name, newList);
        } else {
            // Should the list be totally replaced? below clears and adds all items
            ObservableList<T> observableList = (ObservableList<T>) list;
            observableList.clear();
            observableList.addAll(newList);
        }
    }

    default <T> ObservableList<T> refObservables(String name) {
        List list = (List) getModelProperties().get(name);

        if (list == null) {
            list = FXCollections.observableArrayList(getValues(name, new ArrayList<>()));
            getModelProperties().put(name, list);
        }

        if (! (list instanceof ObservableList)) {
            list = FXCollections.observableArrayList(list);
            getModelProperties().put(name, list);
        }

        return (ObservableList<T>) list;
    }
}

Employee Class

A class named Employee which implements the PropertyAccessor interface. Below you will notice the property name of each field is declared using a public static final String. For example, the employee’s name is:

public static final String NAME_PROPERTY = “name”;

For the accessor methods such as getters, setters and xyzProperty() you will notice the calls to the default methods in the PropertyAccessor interface.

package com.jfxbe;

import javafx.beans.property.ObjectProperty;
import javafx.beans.property.SimpleStringProperty;
import javafx.beans.property.StringProperty;
import javafx.collections.ObservableList;

import java.util.ArrayList;
import java.util.HashMap;
import java.util.List;
import java.util.Map;

/**
 * A hybrid domain and model object using the shadow field pattern to save memory.
 * Created by cpdea
 */
public class Employee implements PropertyAccessors{

    /** This is a map to hold properties and observables */
    private Map<String, Object> modelProperties;

    public static final String NAME_PROPERTY = "name";
    public static final String POWERS_PROPERTY = "powers";
    public static final String SUPERVISOR_PROPERTY = "supervisor";
    public static final String MINIONS_PROPERTY = "minions";

    public Employee(String name, String powers) {
        setName(name);
        setPowers(powers);
    }

    @Override
    public Map<String, Object> getModelProperties() {
        if (modelProperties == null) {
            modelProperties = new HashMap<>();
        }
        return modelProperties;
    }

    public final String getName() {
        return getValue(NAME_PROPERTY, "");
    }
    public final void setName(String name) {
        setValue(NAME_PROPERTY, name);
    }
    public final StringProperty nameProperty() {
        return refProperty(NAME_PROPERTY, SimpleStringProperty.class, String.class);
    }

    public String getPowers() {
        return getValue(POWERS_PROPERTY, "");
    }

    public final StringProperty powersProperty() {
        return refProperty(POWERS_PROPERTY, StringProperty.class, String.class);
    }

    public final void setPowers(String powers) {
        setValue(POWERS_PROPERTY, powers);
    }

    public final Employee getSupervisor() {
        return getValue(SUPERVISOR_PROPERTY, null);
    }

    public final ObjectProperty<Employee> supervisorProperty() {
        return refProperty(SUPERVISOR_PROPERTY, ObjectProperty.class, Employee.class);
    }

    public final void setSupervisor(Employee supervisor) {
        setValue(SUPERVISOR_PROPERTY, supervisor);
    }

    public final List<Employee> getMinions() {
        return getValues(MINIONS_PROPERTY, new ArrayList<>());
    }

    public final ObservableList<Employee> minionsObservables() {
        return refObservables(MINIONS_PROPERTY);
    }

    public final void setMinions(List<Employee> minions) {
        setValues(MINIONS_PROPERTY, minions);
    }

}

Conclusion

So, there you have it, a solution to in an attempt to eliminate two variables and other boilerplate code. I haven’t actually tested the code with a large amount of data, so maybe in another post or some lucky reader will create a test comparing all three (object with all properties, Dirk and mine) implementations.

The possible downside to this approach is probably serializing the object when used with RMI servers. I’m sure there are other possible downsides, but for now most use cases this might be easier and cleaner code to deal with.

Please feel free to comment. Subscribe if you like this article. 🙂

References:

https://dlemmermann.wordpress.com
https://docs.oracle.com/javase/8/javafx/api/javafx/beans/property/Property.html
http://blog.netopyr.com/2011/05/13/javafx-properties/
https://projectlombok.org
http://www.jgoodies.com/freeware/libraries/binding

Raspberry Pi with Java: Programming the IoT (Book Review)


Cover of the book Raspberry Pi with Java: Programming the Internet of Things (IoT)

Raspberry Pi with Java: Programming the Internet of Things (IoT) Embedded Application Development for Home and Industry

Greetings Java/JavaFX/Raspberry Pi fans!,

Before beginning this book review it was brought to my attention that I had to disclose lawyer speak in order to comply with FTC rules relating to bloggers.

Disclosure of Material Connection: I received this book free from Oracle Press / McGraw-Hill Education (Publisher) In exchange for a book review. I was not required to write a positive review. The opinions I have expressed are my own. I am disclosing this in accordance with the Federal Trade Commission’s 16 CFR, Part 255: “Guides Concerning the Use of Endorsements and Testimonials in Advertising.”

Introduction

It is the year 2016, and by now we should be at more than a billion connected devices related to the Internet of Things (IoT) which numerous firms have predicted. If you’re like me a person who loves to tinker and discover things you have probably heard about the Raspberry Pi. On my journey to learn all things Pi I’ve come across many books related to the Raspberry Pi that utilized various programming languages, however when it came down to the Java language the books were pretty scarce.

Look no further, a new book has finally arrived that focuses on Java technologies to drive your Raspberry Pi projects. In this blog entry I will be reviewing the book Raspberry Pi with Java: Programming the Internet of Things (IoT) by Stephen Chin with James L. Weaver  (Oracle Press). Technical editor by Mark Heckler.

Book Review

The two book authors are some of the most respected in the IoT, Java and JavaFX communities. Both Stephen Chin (Oracle) and James Weaver (Pivotal) are Java champions who are renowned speakers at many major developer conferences worldwide. The technical editor Mark Heckler (Pivotal) is also a well known Java geek who also speaks at many prominate conferences around the world.

For starters the authors begin with a very good introductory and summary of the chapters. After the summary of the chapters the book points out two links to download the source code for the book. Other programming books with source code usually point to their publishing company’s website. Fortunately, this book provides two places to obtain the source code. One at the publishing company (www.mhprofessional.com) and the other is hosted at the Github (https://github.com/RaspberryPiWithJava).

Chapter 1: Baking Pie

The authors gets you started by listing all the component parts and software necessary to develop on the Raspberry Pi. The instructions on how to setup and configure the Raspbian OS are thoroughly explained. I like how the authors discuss how to connect all the different Raspberry Pi models to your network. Keep in mind that the book was written prior to the announcement of the Raspberry Pi Zero model, so the book has no mention of it.

In chapter 1 they show you how to connect your Raspberry Pi using Ethernet or Wireless connection. After, successfully connected, the authors show you how to ssh into your Raspberry Pi remotely from the three major OS platforms (MacOS, Linux and Windows) through your terminal (command-line console). Once able to ssh into your Raspberry Pi you will be able to code/compile and run a Hello World Java console application.

Chapter 2: Your First Java Project

In Chapter 2, the authors begin by walking you through setting up the NetBeans IDE to remotely debug live running code on a Raspberry Pi. Once you get comfortable with the developer workflow, the authors start out with a cool (hot) project on brewing the perfect cup of coffee! When beginning a project the authors always start off with a Bill of Materials detailing what and where to buy parts for a project.

In this chapter it delves into APIs (JSR 80) that allows your Java code to communicate with USB ports (usb4j). The authors show you how to read information from a USB port on an electronic scale device. The scale is used to measure the weight of things such as ground coffee beans. This chapter ends with the discussion of the topic of Commercial Licensing and FOSS. Learning about licensing options can help you navigate through legal matters if you decide to go commercial with your Java/Raspberry Pi product.

Chapter 3: Binary Timer

The authors goal in this chapter focuses on how to use GPIO (general purpose input output) pins. The GPIO pins are how the Raspberry Pi talks to analog and digital components such as LEDs, DC motors and light sensors. In this section you will learn the fundamentals of electronics such as power, Ohms law and what resistors you will need to purchase, etc. I love one of the tip blocks on “What is the Worst You Can Do to Your Raspberry Pi“. This tip allows you to not feel intimidated when approaching a Raspberry Pi by explaining how rugged the Raspberry Pi computer actually is, and how to prevent mishaps or damaging the Pi.

The authors mention two Java libraries commonly used for accessing GPIO pins on the Raspberry Pi. One being the Device I/O library and the other Pi4J. In this section the benefits of using each library are fully detailed. This chapter is very hands-on by creating a basic project using LEDs on a breadboard that can count down in binary. Many Fritzing diagrams are presented for step-by-step instruction on how to wire-up components properly. In this chapter the authors mention helpful troubleshooting tips such as Java code to solve the button debouncing issues when dealing with physical buttons or switches in your circuits. Lastly, this chapter provides bonus content that teaches you how to measure and compare performance metrics when using the two Java libraries Device I/O library and Pi4J by turning LEDs on and off very rapidly. Here, both memory-mapped access (Low-level) vs Sysfs access (Higher-level) were compared. This will help you decide which strategy is best depending on your use-case.

Chapter 4: IoT Hat

Now with the fundamentals of the Raspberry Pi, Java and basic electronics out of the way, you can now tackle a magical project that will astonish friends and family. This project involves creating a magicians top hat with the ability to know what playing card was chosen without seeing the face of the card. The authors teach you about how to configure your Raspberry Pi to enable I2C, SPI, and UART protocols. This chapter focuses on learning about NFC/RFID devices such as smart card readers. Beware: This section involves soldering so get your flux on. Here, you will learn how to communicate with an RFID reader’s breakout board.

This project also teaches you about compactness and portability (cordless) because you will be hiding stuff in a top hat. To make things portable the Pi will use a WiFi adapter and USB cell phone charging battery. The authors will also take you through native libraries required for Java to communicate with the NFC device so don’t be alarmed if you encounter Make files and permissions (typical in the Linux world).

Chapter 5: Line Runner

After learning skills for compactness and portability from chapter 4 the authors show you how to reuse your skills to build an autonomous robot! This should be the very reason to get this book. In the Bill of Materials all the parts (Makeblocks) you will need are detailed thoroughly. The robot will be able to anticipate obstacle while capable of following a lined path on a floor surface (Delivering mail comes to my mind). This chapter is focused on sensors, motors, and mechanical construction. With sensors the authors take you through how to use infrared and ultrasonic capabilities. When using motors this chapter explains pulse width modulation (PWM) to control the speed of the robot. The Java code examples are quite straight forward and concise.

Chapter 6: Tea Station

Not a coffee drinker? but a Java fanboy well, this project is for all the tea lovers (including you) out there! This project is building a tea station to steep the perfect cup of tea. In this chapter the author discusses electronic scales (again) except ones having better precision due to tea leaves being extremely light in weight. The author goes on to discuss about temperature sensors that can determine how hot the tea should be when below the temperature of boiling water with very good accuracy. The author delves into serial (RS232 to TTL) communications with various vendors selling electronic scales (In chapter 2, USB was used). Learning this skill is invaluable because many older devices still use serial communications, so you can adapt your ideas with just about anything.

In this chapter the author really takes things to the next level compared to chapter 2 (brewing coffee), because he teaches you how to implement a snazzy JavaFX UI on a touchscreen device! Just like the chapter on brewing coffee the authors have an incredible depth of knowledge on teas and types of teas.

Chapter 7: Autonomous Drone

I’m sure you’ve heard a lot about the drone craze well this chapter will knock your socks off! The authors will be employing a quadcopter and the Raspberry Pi capable of flying autonomously. Don’t be afraid the drone in this project it will not hurt you. Interestingly, enough this chapter will use two WiFi adapters to be attached to the Raspberry Pi (Model B). One adapter is to talk to the drone itself and the other is used as a wireless access point (WAP) to remotely talk to the Raspberry Pi. In this chapter the author highlights an API called Autonomous4j by Mark Heckler. Mr. Heckler is also the technical reviewer of this book. I’ve actually seen the drone in action at a JavaOne conference where Mr. Heckler and Mr. Weaver conducted a live demonstration. The APIs discussed in this chapter are very easy to use for example the following are some of the Java methods:

  • takeoff() – Causes drone to start and take off.
  • goLeft/goRight(int speed) – Given the percent of speed to fly left/right (its left or right)
  • forward/backward(int speed) – Cause drone to go forward/backward given a percent of speed
  • goHome() – Drone flies back to where it lifted off from
  • land() – Land and stop.

Chapter 8: Retro Video Game Emulator

Whoa!? If you are an 80s or 90s kid who enjoyed arcades and game consoles (I know I did) then this chapter is about creating an Nintendo Entertainment System (NES) game console! Most of the parts from the bill of materials can be obtained from the popular electronics company Adafruit. The author teaches you how to build a game controller, attach a speaker, and attach a LCD touch display. This project will involve learning how to connecting GPIO pins to the Kippah board to control a touchscreen display. The author walks you through using a NES emulation Java library halfNES by Andrew Hoffman. As most of you know when dealing with emulators it isn’t legal to play game ROMs of popular games back in the day, unless you actually own the old game cartridge, so the author suggest heading over to a site having free games you can play. I’m sure if you own Mario Brothers you can get the game ROM and try it out. The author ends the chapter with more hacking tips such as overclocking your chip to increase the performance of your Pi. It’s a game so you need it to run fast!

Chapter 9: NightHacking RetroPi

After you’ve learned from chapter 8 on how to build a game console, this chapter will show you how to make a portable hand-held game device just like a Nintendo Game boy!  The author is thoughtful in discussing about the pros and cons on various 3D printers and existing DIY communities at large. This chapter points out all the necessary software to print parts for your hand-held game device. The author provides great illustrations to step you through creating a polished product.

Conclusion

This book has opened my eyes to innovative ideas using Java with the Raspberry Pi. The content is well organized and easy to follow. Often other DIY books have difficulty explaining the integration between hardware and software, but this book blends the two together elegantly. This book is very definitive in terms of the numerous topics, vendors, components, comparisons and implementation strategies. The authors hit on practically every topic relating to how to command and control (many types of) devices.

A good number of projects are very hands-on with an emphasis on the engineering side of things as opposed to the software side (solely a software developer). If you like to build cool gadgets and comfortable with the Java programming language I urge you to get this book.

My only issue (tiny) is the paperback book’s illustrations are in black and white (gray-scale) which can make it difficult to see things such as colored resistors in the Fritzing diagrams or JavaFX UIs (User Interfaces). I believe the PDF version might be in color, but I’ve not seen it yet (just a hunch). But, overall I give this book a two thumbs up. By far, this book is the most comprehensive book combining two great technologies with a plethora of amazing DIY projects to date.

FX Playground


Update: The FX Playground project can be found at: https://bitbucket.org/cdea/fxplayground

Logo5

Introduction

FX Playground is a JavaFX-based prototyping tool or live editor that eliminates the step of compiling Java code. This concept isn’t new, for instance the Web world there are many HTML5 playgrounds that offer online editors that enable developers to quickly prototype or experiment with various JavaScript libraries. This allows the developer to focus on visualizations or UI details without needing to set-up an IDE project or mess with files. Even older (pre-dating) than playgrounds are REPLs (Read Eval Print Loop) where dynamic languages such as Groovy, Python, Ruby, etc. provide an interactive interpreter command line tool to allow developers to quickly script code to be executed. Scala is a compiled language, but also provides a REPL tool.

After finishing the book JavaFX 8 Introduction by Example I noticed each example was created as separate NetBeans projects which seemed a little overkill for small examples. Because the book is based on Java the language each program needed to be compiled (via javac) prior to execution. Larger projects will typically need to be set-up with a proper classpath and resources in the appropriate directory locations. Even larger projects will also need dependencies which typically reside on Maven repositories.

JavaOne 2014

Based on timing I was able to submit a talk regarding JavaFX based playgrounds just in time. After awhile I was pleasantly surprised that my proposal (talk) was accepted. You can check out the session here. Also, I will be presenting with my good friend Gerrit Grunwald (@hansolo_). So, be prepared to see awe-inspiring demos. Since the talk is a BoF (birds of a feather) the atmosphere will be low-key and very casual. I hope to see you there!

The JavaOne talk is titled “JavaFX Coding Playground (JavaFX-Based Live Editor Tool) [BOF2730]”.  Based on the description you’ll find that the tool will be using the NEW! Nashorn (JavaScript) engine to interact with JavaFX primitives. The figure below depicts the FX Playground tool’s editor windows and a JavaFX Display area. Starting clockwise at the lower left is the code editor window allowing the user to use JavaScript (Nashorn) to interact with nodes. Next, is the JavaFX FXML editor window allowing the user to use FXML (upper left). The FXML window is an optional.  In the upper right, you will notice the JavaFX CSS editor window allowing you to style nodes on the display surface. Lastly, to the bottom right is the output area or better known as the DISPLAY_SURFACE.

FXPlayground's editor windows

FXPlayground’s editor windows

FX Playground in Action

Because FX Playground is still in development I will give you a glimpse of some demos that I’ve created on Youtube. The following are examples with links to videos.


Roadmap

There are plans to opensource the code, but for now there is much needed functionality before public consumption.

The following features are a work in progress:

  • Make use of FXML editor window.
  • Pop out the display panel into its own window
  • Save, SaveAs, and Load Playgrounds
  • Build software to be an executable for tool users. (90% done)
  • Make the tool capable of using other languages (JSR 223)

I want to thank Oracle corp. especially the following engineers who helped me (some of the engineers below are not Oracle employees):

References

The FX Playground project can be found at: https://bitbucket.org/cdea/fxplayground

CarlFX’s Channel – https://www.youtube.com/channel/UCNBYRHaYk9mlTmn9oAPp1VA

7 of the Best Code Playgrounds – http://www.sitepoint.com/7-code-playgrounds

NetBeans – https://www.netbeans.org

JavaFX 8 Introduction by Example – http://www.apress.com/9781430264606

Nashorn – https://wiki.openjdk.java.net/display/Nashorn/Main

Enzo – https://bitbucket.org/hansolo/enzo/wiki/Home

Harmonic Code – http://harmoniccode.blogspot.com/

JavaFX 8u20 Days of Future Past (Always On Top)

It’s been a long time since I’ve posted topics relating to JavaFX. So, if you are still following along, awesome!

Introduction

In this blog post I want to blog about a very cool feature starting with JavaFX 8 update 20 that allows your application to always be on top of other applications. What this means is that on your desktop your JavaFX based application can be a floating widget that will remain above all other applications (z-order). An example would be a weather widget in the upper right corner never to be obscured by other applications. So, I’m very excited to share with you this amazing feature ‘Always On Top’.

History

In the past Java Swing developers would rely on the method Window.setAlwaysOnTop(boolean).  This feature allowed Swing developers to build native looking and native behaving desktop applications. Ever since JavaFX 1.x this very feature was highly requested (originally requested by Stephen Chin @steveonjava for the WidgetFX framework). This feature request is JIRA ticket RT-153. Figure 1 is the feature request shown with a status of ‘Resolved’.

Jira ticket RT-153

figure 1: Jira ticket RT-153


Although this feature didn’t get into JavaFX versions 1.x, 2.x and the version prior to Java 8u20, it is finally here now. For those who don’t know how to report bugs or file new features requests I encourage you to head over to the JavaFX JIRA system.

Example: Weather Widget

Assuming you know the basics of JavaFX since version 2.0 a typical application would consist of extending from the javafx.application.Application class. When developing JavaFX desktop applications the platform API would provide you with a (javafx.stage.Stage) window. The Stage object will have the following methods to access the always on top property.

  • alwaysOnTopProperty()
  • setAlwaysOnTop(boolean)
  • isAlwaysOnTop()

The following code snippet sets the Stage to be always on top using the method setAlwaysOnTop(boolean).

public class KeyholeDemo extends Application {

   @Override public void start(Stage primaryStage) {
      primaryStage.initStyle(StageStyle.TRANSPARENT);
      primaryStage.setAlwaysOnTop(true);
      // code omitted...
   }

   public static void main(String[] args) {
     launch(args);
   }
}

How it works

Shown in the listing above the start() method sets the stage to be transparent to be a JavaFX window without a title bar. This allows applications to have irregular shaped windows on the desktop. If a web person trolls you again about JavaFX ask them the following question: “Can  HTML5 create irregular shaped windows on the desktop? (always on top)”. Next, the stage is setup to be always on top via the setAlwaysOnTop() method.

Demo

After realizing that this highly requested feature was available I basically updated my old ‘KeyholeWidget‘ project at the Github and created a video demonstrating the widget on my desktop. Here is the video:

To see the full code listing visit the Github project ‘KeyholeWidget‘.


I hope you’ve enjoyed this cool feature (I know I did). As usual please leave comments below.

Happy coding,

Carl